Having electricity in your van is just plain awesome. It means you can live completely off the grid with lights, a fridge, phones and computers – all while not worrying about electric bills or power outages.
Many vandwellers install solar power in their rigs. But sometimes solar just isn’t enough – especially if your budget doesn’t allow you to throw down for a huge multi-panel system.
Cloudy weather, wildfire smoke, and camping in shady forests can limit the amount of sunlight getting to your panels, leaving you scrambling for adequate sun to recharge your depleting batteries. Even with our larger 400W system we’ve run into problems with battery drain after about 4-5 days in poor sunlight conditions.
That’s why we highly recommend setting up your campervan electrical system to charge your batteries from your van’s alternator while you’re driving.
Charging from your alternator is a great way to supplement your van solar panels and make sure your batteries stay topped off no matter the weather. And if you’re on a tight budget, you can even skip the solar and still have basic electricity in your DIY van build.
Life on the road means a fair amount of driving, and having the ability to charge your batteries while driving is essential for vanlife.
This post is adapted from our ebook Vanlife Solar Basics.
Are you tired of jumping from website to website trying to wrap your head around your van’s electrical system? Our comprehensive guide covers everything from fundamentals to components to sizing to installation, all in one easy-to-follow package.
How To Charge Your Van’s Batteries While Driving
Every vehicle has an alternator. An alternator is a device that converts the mechanical energy from your van’s engine into electricity, and uses that electricity to power electronics in your van and charge your starting battery.
You can easily use your alternator to charge your second (auxiliary) battery simply by connecting the positive terminals of both batteries so that they’re in parallel. But paralleling your batteries means that when the engine’s off, your electrical loads will also drain the starting battery – not good if you want to start your van in the morning!
So you need a device that allows you to charge a second (auxiliary) battery from your van’s alternator without draining your starting battery when the engine isn’t running.
There are two kinds of devices for this: DC-DC chargers and Battery Isolators.
We’ll go over both in this post, but in general we recommend that most people get a DC-DC charger for their rigs.
What is a DC-DC Charger?
A DC-DC charger (also known as a battery-to-battery charger, or b2b charger) is a device that takes the input from your alternator/starting battery and uses it to charge your aux battery.
DC-DC chargers are able to charge just about any type of battery (including lithium), they work with modern variable voltage alternators, and they employ multi-stage charging to fully and properly charge your battery bank.
DC-DC chargers come in two varieties: single input and dual input.
Single Input DC-DC Chargers
Single input DC-DC chargers do one thing, and one thing only: charge your aux battery from your alternator. This is what you want to get if you already have your solar equipment, or if you want the flexibility to pick and choose the exact specs you need for each component.
Pros
- Variety of amperages available to suit your specific requirements
- Easy add on to solar panel kits or existing solar setups
Cons
- Another component taking up room
- May require tapping into ignition circuit

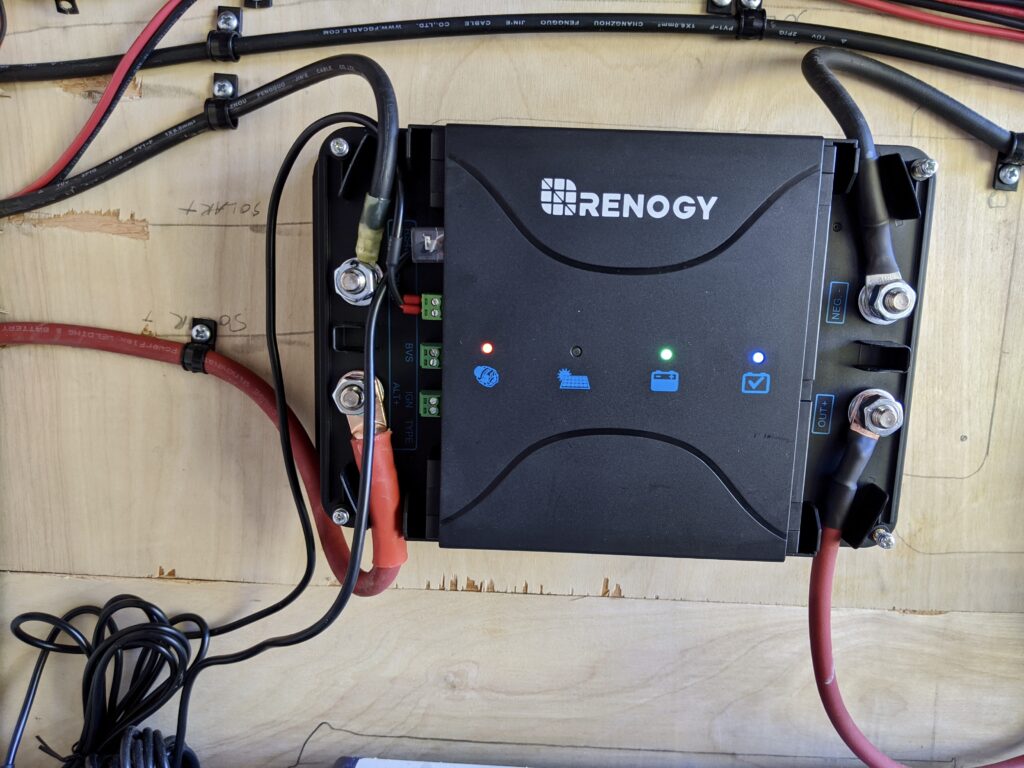
Charges your auxiliary batteries from your alternator. Also available in 20A and 60A sizes.
- 20A size is best for 40Ah+ LFP or 100Ah+ AGM batteries
- 40A size is best for 100Ah+ LFP or 200Ah+ AGM batteries
- 60A size is best for 120Ah+ LFP or 300Ah+ AGM batteries
Enter discount code Gnomad8 for 8% off at Renogy.com
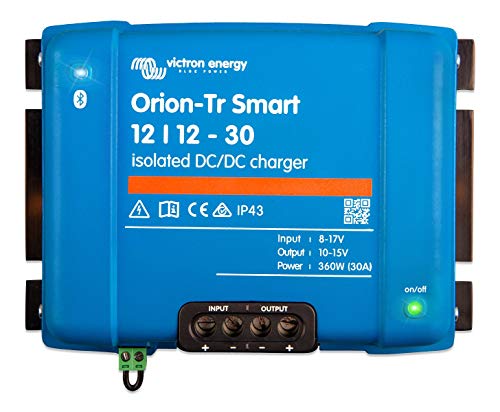
Smart DC-DC charger from Victron with Bluetooth connectivity. Comes in models ranging from 12A to 30A.
Dual Input DC-DC Chargers
Dual input DC-DC chargers, on the other hand, also function as solar charge controllers. So with just a single unit, you can charge your batteries from your solar panels and from your engine. This makes installation a whole lot easier, and it makes your electrical system look a bit cleaner.
However, combined units like this take away the flexibility to really customize your solar setup independent of your engine charging, since you’ll be locked in to the specs of your DC-DC charger (For example, Renogy’s DCC50S can only accept 25V solar input, which means you must wire your panels in parallel to stay under that voltage).
But, if you were planning on wiring your panels in parallel anyway, then the DCC50S allows you to have one less component in your system.
Pros
- One unit handles both solar and DC-DC charging
- Easy to install (usually no ignition tap)
- Also tops off your starter battery
Cons
- Less flexibility with charging parameters
- Need to assemble your own solar components vs buying a kit
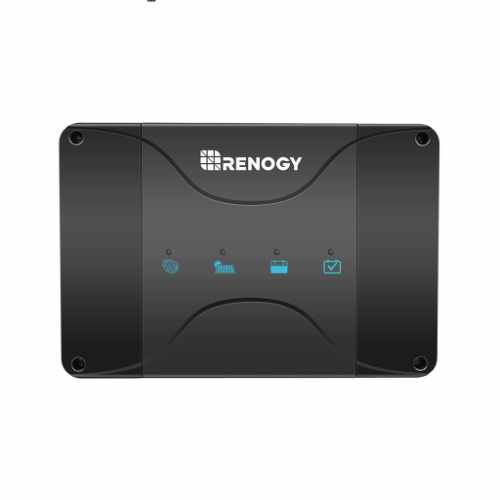
One unit for all your charging needs. Charges your aux batteries from solar and your van's alternator. (Bonus: it also tops off your vehicle starting battery from your solar).
Also comes in 30A size.
Enter discount code Gnomad8 for 8% off at Renogy.com

40A dual input charger that allows you to charge from both solar and your alternator. Also available in a 50A version.
What is a Battery Isolator?
A battery isolator is a device that allows you to charge an auxiliary battery from your van’s alternator, while keeping your starting and aux batteries “isolated” from each other.
Battery isolators are inexpensive, and they’re generally pretty easy to install. However, they are not always the best choice for your van’s electrical needs, and in most cases a DC-DC charger is what you should go with.
Battery isolators may not work properly with modern variable voltage alternators, won’t work with lithium batteries (unless you pay through the nose for a lithium-specific isolator), and may not maintain the proper voltage to fully charge your aux batteries.
There are three types of battery isolators out there: solenoid battery isolators, solid state battery isolators, and voltage-sensing relays (or “smart” isolators). Voltage-sensing smart isolators are far and away the best choice, so we’ll focus our discussion on these.
Smart battery isolators work by automatically sensing the voltage of your starting battery. When the voltage reaches 13.3V (meaning the engine is on and the battery is fully charged), the isolator “cuts in” and sends 100% of the alternator’s current to your auxiliary battery. When the starting battery voltage drops to 12.8V (meaning the starting battery is no longer charging), the isolator “cuts out” to prevent your starting battery from draining.

Rugged and durable smart battery isolator for charging your aux battery while driving. Easy to install, and IP65 certified.
The KeyLine Chargers Iso-Pro140 Smart Battery Isolator has worked out great in our van. It’s small and compact, it’s very simple to install (the hardest part is running battery cable from the engine compartment to the rear of your vehicle). And it’s IP65 certified, which means you won’t have to worry about it failing after driving the dusty road to Burning Man.

Everything you need to install your smart battery isolator. Includes the Iso-Pro 140, battery cable, crimp terminals, and lugs.
The KeyLine Iso-Pro 140 is also available as a kit that includes wiring, rings, terminals, etc, which should help make installation a whole lot easier.
When to Use a Battery Isolator (and when not to)
Battery isolators will work in your rig if all of the following are true:
- You have an older van with a fixed voltage alternator. Battery isolators need a consistent voltage to work properly. If you have a newer vehicle (about 2015 or newer) with a variable voltage “smart” alternator, an isolator probably won’t work for you.
- Your auxiliary batteries are lead acid (AGM, gel, flooded lead acid). Most isolators won’t function properly with lithium batteries. (There are lithium-specific isolators out there, but they’re super expensive and thus kind of pointless.)
- You’re on a tight budget. Battery isolators are cheaper than DC-DC chargers, but that’s about the only advantage they have. If you’re not on a tight budget, you’ll be better off with a DC-DC charger.
If all three of the above apply to you, then awesome – get a battery isolator for your rig.
However, if any of the above do not apply to you, then you need a DC-DC charger.
DC-DC Chargers vs. Battery Isolators
On the surface, DC-DC chargers seem very similar to battery isolators. Both allow you to charge your auxiliary battery while driving, and both prevent your starting battery from draining when your engine is off. But the difference is in how they charge your aux battery.
Battery isolators simply parallel your starting and aux batteries together, which puts them at the same voltage. So if your alternator is sending 14.4V into your starting battery, the battery isolator connection will put your aux battery at 14.4V also (meaning it’s charging).
There are a few issues with this:
- With modern variable voltage alternators the voltage output can fluctuate, preventing the battery isolator from kicking in.
- If your alternator isn’t putting out enough voltage, your isolator may only partially charge your aux battery. This can lead to battery degradation over time.
- Voltage drop can be an issue if you have a long wire run connecting your isolator to your aux battery.
DC-DC chargers, on the other hand, take voltage input from your alternator/starting battery and boosts it to the proper voltage for charging your aux battery. They do this by putting a “load” on your alternator, so that you alternator treats it like it would, say, a light bulb, and sends power to it. No matter what voltage your alternator is putting out, a DC-DC charger will send the proper charging voltage to your aux battery.
There are a few advantages to ths:
- DC-DC chargers can handle the fluctuations of modern variable voltage alternators and still charge your aux battery properly
- DC-DC chargers can employ multi-stage charging, so you know your batteries are being properly and fully charged.
- DC-DC chargers can work with different charging profiles, meaning you can use them to charge different types of batteries (including lithium).
What are the downsides to DC-DC chargers? Mainly that they are slightly more expensive than battery isolators, and they may be a little more difficult to install (since some DC-DC chargers require you to tap into your ignition circuit).
But DC-DC chargers are way more flexible and capable than battery isolators, and we think they’re the best overall choice for vanlife.
What Size DC-DC Charger or Battery Isolator Do You Need?
DC-DC chargers and battery isolators comes in different sizes, indicated by amperage (i.e. a 60A DC-DC charger, or a 140A battery isolator). How do you pick the right size for your van?
Sizing a DC-DC Charger
When selecting a DC-DC charger, you want to size it based on the charge rate of your aux batteries. This is based on your battery chemistry – so an AGM battery has a different charge rate than a lithium battery.
Here’s the general rule of thumb for battery charge rates:
- Lithium batteries (LiFePO4, etc.) can be charged at 0.5C (or, 50% of capacity***). This means that a 100ah battery can be charged at 50A.
- Lead acid batteries (AGM, gel, FLA, etc.) can be charged at 0.2C (or, 20% of capacity***). This means that a 100ah battery can be charged at 20A.
***Note: These are general guidelines only. Check the specs of your specific batteries before selecting charging components.
DC-DC Charger Sizing Calculator
Keep in mind, this is the maximum charge rate. You could undersize your charger, but don’t oversize it (some DC-DC chargers, like the Renogy models we recommend, have the ability to set a lower charge rate if needed).
Again, double check your specific battery’s specs to make sure you’re getting the right size DC-DC charger.
Sizing a Battery Isolator
The general guideline is to size a battery isolator based on the maximum output of your alternator. You should be able to find this number either in your vehicle’s spec sheet, or stamped onto the alternator itself.
So, if your alternator max output is 175A, then in theory you would need at least a 175A battery isolator.
However, although your alternator may be capable of outputting 175A, not all of that is available for charging your aux battery. Some of that is being used to power the other systems and electronics in your van, so the amperage actually being sent through your battery isolator may be substantially less.
On top of that, most battery isolators out there come in sizes ranging from 125A to 150A. While there are larger isolators available, they get pretty expensive above 150A, and at that point you might as well get a DC-DC charger anyway.
Long story short, if you’re going the battery isolator route a standard 125A to 150A smart isolator should have plenty of capacity in most situations.
Installing a DC-DC Charger or Battery Isolator in Your Van
What You Need
Components
- DC-DC charger or battery isolator
- Deep cycle battery
- Battery cable (size cable based on specs for your specific unit)
- Battery terminal lugs (size for your cable) and crimping tool
- (2) Inline ANL fuses (one for each battery – see fusing specs for your specific unit)
Tools
- Cordless Drill
- Mechanic’s Toolset
- Multimeter
- Zip Ties
- Cable sheathing/flexible conduit (sized for your cable)
Instructions
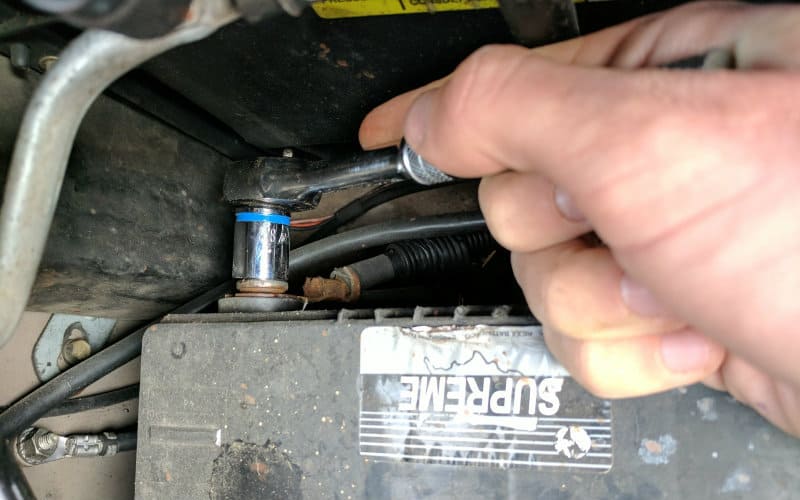
- Disconnect the negative battery terminal from your starting battery. This is an important safety step that isolates the starting battery so you won’t get shocked.
- Mount the charging unit. Find an easily accessible spot. Battery isolators are typically mounted within the engine bay (you may need to temporarily remove your starting battery to make room). DC-DC chargers are typically mounted back by the auxiliary battery so they are out of the elements.
- Run battery cable from the engine bay to your van’s electrical hub. You may need to run this underneath your van. Cover the battery cable with sheathing or flexible conduit to prevent shorts. Use zip ties to keep it out of the way. Make sure there the cable is tight and that there is nothing loose hanging down. Drill a hole up through your van’s floor to route the wire inside. Seal this with silicone caulk.
- Ground the charging unit. Attach the DC-DC charger or battery isolator to a common ground point on your van’s chassis. It’s best to use an existing ground screw.
- If needed: Tap the charging unit into your vehicle’s ignition circuit. Some DC-DC chargers (and battery isolators) require that you tap into your van’s ignition circuit.
- Attach the charging unit to your starting battery. Cut and crimp battery cable to the size that you need. Run a cable from the DC-DC charger or isolator to an inline ANL fuse, then another cable from the fuse to your starting battery (for DC-DC chargers, this is the long cable you ran under your van. Battery isolators are mounted in the engine bay).
- Attach the charging unit to your aux battery. Cut and crimp battery cable to the size that you need. Run a cable from the DC-DC charger or isolator to an inline ANL fuse, then another cable from the fuse to your aux battery (for battery isolators, this is the long cable you ran under your van. DC-C chargers are mounted near the aux battery)
- Reconnect your starting battery and make sure everything works. Fire up your van, wait a few minutes, and check to make sure your aux battery is charging. DC-DC chargers should give you a readout. Battery isolators will have indicator lights, and you can also check the voltage at your aux battery terminals using a multimeter.
Step 1: Disconnect the negative battery terminal from your starting battery.
Find an easily accessible spot. Battery isolators are typically mounted within the engine bay (you may need to temporarily remove your starting battery to make room). DC-DC chargers are typically mounted back by the auxiliary battery so they are out of the elements.
Step 2: Mount the charging unit.
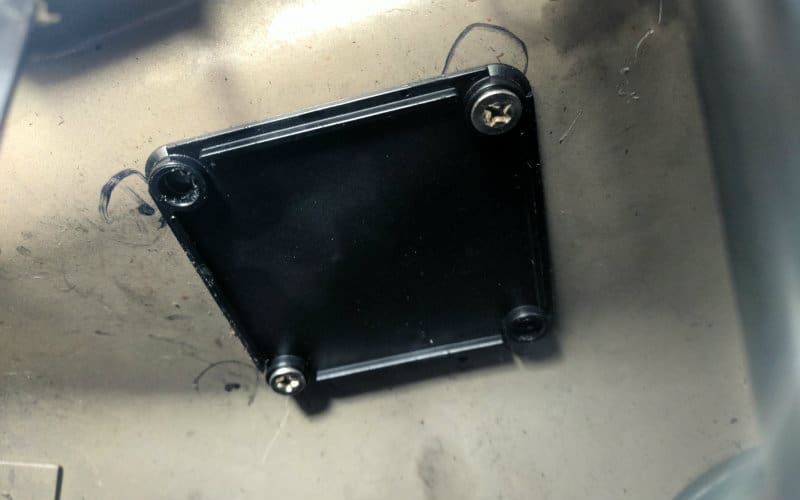
Find an easily-accessible spot to mount your charging unit. DC-DC chargers typically mount back by your aux battery. Battery isolators are typically mounted in the engine bay (you may need to temporarily remove your starting battery for this step).
Step 3: Run battery cable from the engine bay to your van’s electrical hub.

You may need to run this underneath your van. Cover the battery cable with sheathing or flexible conduit to prevent shorts. Use zip ties to keep it out of the way. Make sure there the cable is tight and that there is nothing loose hanging down. Drill a hole up through your van’s floor to route the wire inside. Seal this with silicone caulk.
Step 4: Ground the charging unit to a metal point on your vehicles chassis.
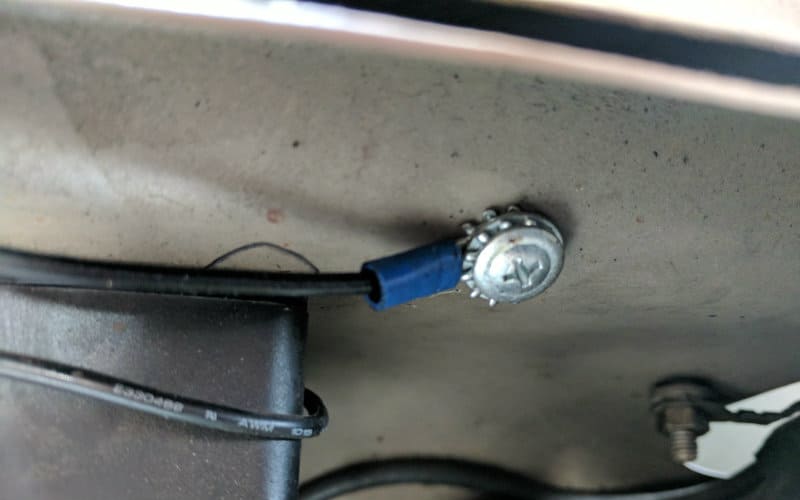
Attach the DC-DC charger or battery isolator to a common ground point on your van’s chassis. It’s best to use an existing ground screw.
Step 5: If needed: Tap the charging unit into your vehicle’s ignition circuit.
Some DC-DC chargers (and battery isolators) require that you tap into your van’s ignition circuit.
Step 6: Attach the charging unit to an inline fuse then to your starting battery.
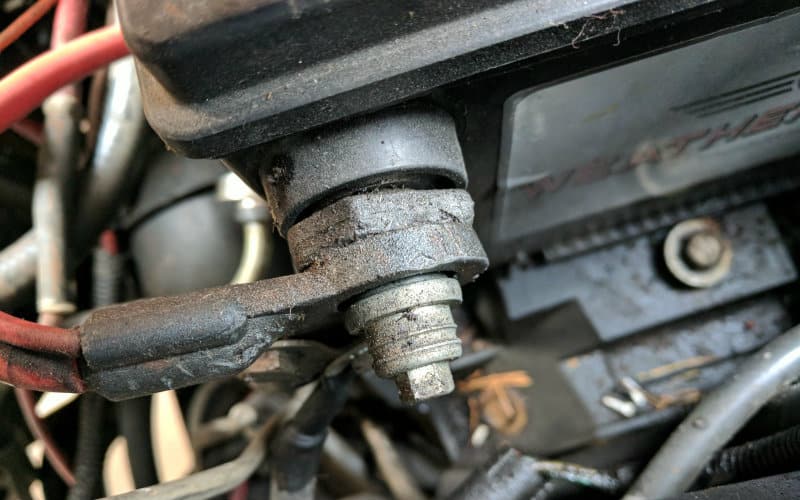
Cut and crimp battery cable to the size that you need. Run a cable from the DC-DC charger or isolator to an inline ANL fuse, then another cable from the fuse to your starting battery (for DC-DC chargers, this is the long cable you ran under your van. Battery isolators are mounted in the engine bay).
Important Note on Fuses
The in-the-box instructions for some battery isolators may not call for any fuses. But adding two inline fuses (one as close as possible to your starting battery and another one close to your auxiliary battery) is an important safety feature.
The purpose of a fuse is to break the circuit in case of an electrical short. When you install an isolator, you’re likely running electrical wire underneath your van. If that wire somehow shorted out and both of your batteries were not fused, you could have a serious problem on your hands.
So – it’s a good idea to fuse both batteries when you install a battery isolator. When in doubt, add a fuse!
How big of a fuse do you need? Unless it’s outlined in the instructions for your battery isolator/DC-DC charger, it’s a good idea to fuse based on the charge rate of your battery.
Step 7: Attach the charging unit to your aux battery.
Cut and crimp battery cable to the size that you need. Run a cable from the DC-DC charger or isolator to an inline ANL fuse, then another cable from the fuse to your aux battery (for battery isolators, this is the long cable you ran under your van. DC-C chargers are mounted near the aux battery).
Step 8: Reconnect your starting battery and make sure everything works.
Fire up your van, wait a few minutes, and check to make sure your aux battery is charging. DC-DC chargers should give you a readout. Battery isolators will have indicator lights, and you can also check the voltage at your aux battery terminals using a multimeter.
Electricity on the Road in Any Conditions!
We think a DC-DC charger (or a battery isolator) should be one of the first things you add to your van’s electrical system. Sometimes solar isn’t enough, or you may not have the budget for solar right away. In either case, a DC-DC charger is a great solution.
No matter if you’re traveling in overcast climes, in the deep forest, or other areas where you may not get enough sunlight, charging your batteries while driving ensures that you can have the power you need in all conditions.


John: What about shore power. I never see a description of charging the house battery with all 3 inputs, Solar, Alternator, and SHORE power. Its’ easy enough to add a shore power to 12VDC inverter, but how do you add that to the system. maybe parallel with the alternator? I just never see anyone describing that issue.
thanks MarkJenkins
Hi Mark, to add shore power you would connect your inverter/charger or separate battery charger to your batteries like normal. I.e., all your charge sources (solar, DC-DC, and inverter/charger) can all be wired into the bus bars connecting to your batteries. They won’t interfere with each other, as they all sense battery voltage and adjust charge parameters accordingly. We’ll be adding some guides on this in the future, so stay tuned!
Hi John, hoping you can help me among a few thousand others with similar situation. I have a GZ Yeti 3k with a link module that can be connected to starter battery for fast charging from alternator while driving. This works well if the alternator is a static one, but does not work well on a smart alternator. So here are my two questions: 1 – can I connect a dcdc charger directly to the GZ link module to charge the GZ? 2 – if answer to 1 is a negative. Then can I setup a small, 50ah lithium house… Read more »
Hello, unfortunately I don’t have direct experience solving this problem with the Yetis. However, based on what I’ve seen, a DC-DC charger that boosts the voltage above the cut off should work in theory. You would want to make sure the DC-DC charger you use outputs the proper amperage that the Yeti is able to accept. The battery solution I’m not sure would work, because then you’re introducing a third battery in the chain, and the first DC-DC charger will be sensing the voltage of this battery to determine its charging behavior. Just a quick note – per the Goal… Read more »
Hi John, very helpful article. I currently have a completely isolated house battery system powered via solar charge controller and has it’s own battery monitor). So far, the solar completely covers my needs, however, I was hoping to tie the starting battery and house batteries together to cover some contingencies. I’d like to self jump start the starter battery, use solar to charge the starter battery and charge the house batteries from the alternator. Is this possible with a DC-DC or battery isolator? Also, if the house batteries need to be grounded to the frame, would that interfere with the… Read more »
Hi James, the Renogy DCC50S can meet most of those needs. It’s a combination DC-DC charger and solar charge controller that charges the house batteries from the alternator and charges both your house and starting batteries via the solar. I don’t believe it has the ability to jump the starting battery, but it will keep it topped off. The other downside is that it’s limited on the amount of solar input voltage it will accept, so you will have to wire your panels in parallel (series or series/parallel will not function). There are a few other companies, such as Victron… Read more »
hi this is really helpful and well written, so thanks. But I am clueless on everything, so some things like “it’s a good idea to fuse based on the charge rate of your battery” are not clear to me. Do you mean the car battery or the leisure battery? I have the 30A renogy dc to dc with mppt, 90ah of LifeP04 and an old non-smart alternator car. What size fuses should i use please?
Hi Anna, that ultimately depends on your specific battery. However, in general, LiFePO4 batteries can be charged at 50% of capacity, so a 90Ah battery can be charged at 45A (we recommend double checking the specs of your specific battery). Therefore, you would want to fuse the battery at 45A or less. Hope that clarifies!
I already have a working solar system with a controller. I want to add the renergy 20 amp dc2dc. Can I have the 2 separate systems charging my house battery at the same time, or will it over charge my house battery?
Hi Charlie, you can have both systems, and they won’t interfere with each other. Both systems are sensing your battery voltage and adjusting their charging parameters, or whether they’re charging at all, based on that. Hope that clarifies!
What a cool site. I have a 2003 Chrysler town and country. I am not a van-lifer. I am a pro disc golfer. So I touring the usa each year in van for 8-9months. Then home for winter. I want to put a small fridge like the boug 23 or 30q. I would be charging my phone and iPad. Sometimes run a small fan. And maybe one of the 12v ovens or single burner stovetop. That’s about it. I’d like to start with the dc-dc from renogy. (Add solar later). My questions are thus. If I get the dc-dc and… Read more »
Hi Mikey, thanks for reaching out! In order to power things from a battery, for DC devices (like your fridge, phone/ipad with a car charger, etc), you would need a DC fuse block wired to the battery, then connected to cigarette lighter or USB outlets. For AC devices (anything with a wall plug) you would need to add on an inverter wired to the battery. Most inverters have outlets built in. On top of that, you would need some kind of enclosure to contain the wiring. We have a post about DIY electrical systems that might be helpful. As far… Read more »
Did you tap into the ignition circuit for the renogy model?
Hi Skyler, the Renogy 20A/40A/60A DC-DC chargers do require tapping into an ignition circuit. The DCC50S charger does not, and also functions as a solar charge controller. Hope that helps!
This is very well written.
Good article. I want to install a DC-DC but I also want to be able to start my Van battery by using the House battery during emergency when my Van battery is drained. How would I do this?
Hi Edgar, the Wirthco Battery Doctor isolator includes a way to reverse the flow so that you can jump your starter battery. However, these units are not super reliable in practice. If you’re building out an energy system from scratch, another option is the Renogy DCC50s. This unit is a DC-DC charger and solar charge controller in one. Not only does it charge your house battery from your alternator, it also charges your starting battery from excess solar when you’re parked. That way you’ll always be topped off. Aside from that, we recommend carrying a portable jumpstarter with you, expecially… Read more »
Great suggestion. Thank you
John-I’m seeing a lot of videos describing people that put a physical switch between the DC2DC and the Inverter. Their explanation is they only turn on the DC2DC whenever the car is running. Then in a follow up, they say they forget to turn off the switch and it drains their battery.
1. is this switch necessary with the DCC50s?
2. How does the inverter know where to draw the power from? Solar, Shore power and/or car battery? Do I need something else to make this decision?
Hi Edgar, every DC2DC charger I’m aware of has built in mechanisms to prevent draining the starting battery, either via an ignition tap or via sensing voltage. I’m assuming these people have chargers that require tapping into the vehicle ignition and they just installed a manual switch instead. No switch is necessary with the DCC50S, and would in fact disable one of its big benefits. The DCC50S takes dual input from solar and the alternator. It basically works off of the voltages of your aux battery, starting battery, and alternator. Keeping the aux battery charged is always the priority, and… Read more »
Thank you for the very thoughtful answer. This all makes sense now.
I have a key line battery isolator and a Renogy 60amp dcdc charger. Can I use both or just use the 60amp Renogy dcdc charger? Also, I have (2) 200amo Renogy amg batteries
Hi Lyne, there wouldn’t be a reason or benefit to using both. I would go with the DC-DC charger, since that will do a better job of fully and properly charging your batteries. Hope that helps!
I found this information very interesting thank you
So glad this was helpful!
Hi John,
If we hook up a DC-DC charger or a battery isolator to my two 100 AH Renogy gel batteries do we have to disconnect the Renogy charge controller while the DC-DC or battery isolator is charging?
Hi Stephen, no need to disconnect the charge controller, they won’t interfere with each other.
Hi John! I saw your article about DC to DC chargers vs isolators. I have a 2015 Chevy Express with an isolator, and I seem to be running into the problem you talked about: the variable voltage of my alternator doesn’t really charge my aux battery very well. I want to switch to the Renogy DC to DC, but I’m not sure whether to get the 20 or 40 amp. A call to Renogy didn’t really clear up matters much. I have Renogy’s 200w solar kit with the Rover 20a charge controller. This is feeding a single VMAX 155ah battery.… Read more »
Hi Tim, you will want to base the size of your DC-DC charger off the charge rate of your battery, which is a function of your battery capacity and chemistry. For AGM batteries like the VMAX, the general rule of thumb is a charge rate of 20% of the capacity. So, the max charge rate of a 155Ah AGM battery is about 31A (155 * 0.2 = 31). The 20A should be your best bet here, although I **believe** the 40A has a switch to make it charge at 20A if you want more ability to expand in the future.… Read more »
Thanks John, that helps a lot. Do you think it’s necessary to put an inline fuse on the power wire from the battery?
Hi Tim, it’s always a good idea to fuse the battery connection. Your battery manufacturer should have fusing recommendations. Hope that helps!
Hi John, I hope you can help. I ordered the Renogy 40A dc-dc charger yesterday but now I think it might be too big?? I have a Beaut 200Ah AGM battery and looked at the specs where it said “Recommended maximum charge current limit: 60A” this means I can charge it at max 60A right so the 40A dc-dc is still good for now. Next, I contacted the van’s garage to ask about the alternator and it is a 150A alternator so this should also be fine for the 40A dc-dc charger. Now… I totally forgot about my 325W solar… Read more »
Hi Thomas, thanks for reaching out. One thing to keep in mind is that not all of that available amperage is going into your batteries all at once – both the DC-DC charger and the charge controller are going to be charging as needed. They both have multi-phase charging, meaning that they’ll charge at different amperages based on the current state (voltage) of your battery. They should not conflict with each other. However, you could fuse your batteries at 60A – so, run the positive cables for your charging sources to a buss bar, then connect the buss bar to… Read more »
Hello John, I want to build a dc-dc charger in my van, when it doesnt have one yet. BLast summer went quite good with the setup atm. 60ah lead acid batter charged by solar, and a ” portable” 40ah lithium( for use with microwave oven and coffee maker etc.) with 230v charger that i charge at home or work. My question is that how SMALL can the DC/DC charger be? In my mind i wouldnt need any bigger than 5-10a charger, that would top up my small batter more than enough. In the same way i save a lot of… Read more »
Hi Robin, I don’t think there’s a limit on how small you can go. There is an upper limit based on your battery capacity, but at the lower end it would just be based on how much current you need to meet your charging needs. 12V cigarette lighter chargers should be fine so long as they will work with lithium. As far as the alternator goes – while it can put out a lot of amps, it’s not force-feeding amperage to anything. Your DC-DC charger should only take as much as it needs from the alternator. The danger is usually… Read more »
Hello! I didn’t build out my van myself (nor have much knowledge on this stuff) but my alternator used to charge my aux batteries so I assume there’s a DC-DC charger or isolator somewhere that I can’t see. But today my aux batteries are low, the charger controller won’t stop beeping, and turning the van on drains them more! When I turn the van off, the charge goes up a little. Any ideas??
Hi Emily, if the voltage increases when you turn your van off, then there might be a load being applied to the batteries when the van is on. If the alternator were charging the battery, then voltage should drop when you turn the van off. Hope that helps a bit!
~John
Hi John, – decking out a newly aquired van and auxillary battery questions arrise. If I fit an isolater and it is joining the batteries together only when the ignition is on through a damper of sorts so as too much power goes either way should this be OK. – The van has an auxillary battery 120AH Lithium and solar panels, as the van is quite small weight and space are an issue. It has AC and a microwave and a electric dolly wheel not yet fitted. I am concerned about the 500w motor on the dolly wheel and if… Read more »
Hi Maxwell, I’ve definitely seen people contain the bulk of their power components in a tow behind to save on living space in their van. That could work nicely for you if that is your preference. As far as the dolly wheel – is it AC or DC? If DC then you definitely could add a small battery to run it. When we bought our van it had a wheelchair lift installed, and it came with a small separate battery to run that and the fold down bench seat. Hope that helps!
~John
Hey this has helped me so much. Can you tell me what size wire you used to connect your inverter?
Hi Paula, so glad this has been helpful. In our van, we used 2 AWG wire to connect our inverter, and fused it at 100A. Your inverter instructions should tell you what size wire and fuse to use. When we did our first build, we didn’t feel like messing with wire thicker than 2 AWG (even though our inverter said to use 1/0 I believe with a 150A fuse), so we just used 2 and a 100A fuse. It’s vitally important to always size your fuses based on your wire gauge – this protects the wire from taking more current… Read more »
Hi there, I recently contacted Renogy about a 20 amp DC to DC charger as I wondered if the charger disconnected the Starting battery during power draw. The answer was it disconnected from the starter battery at 8 volts !!! isn’t this way to low, most disconnect around 12.2. Can you please advise
Hi Russ, Renogy’s DC-DC chargers don’t use a voltage cutoff, because they are tapped into the ignition circuit and will not run if the engine is not running. I’m not sure why they would tell you that.
Thanks for the article! I can’t seem to find your more detailed writeup on the installation of the Keyline 140, including the addition of fuses. Is it still available?
Hi Scott, we had the images down to update this post, but we’ve since restored them. Hope that’s what you were looking for!
~John
Hello John,
What if you have 2 alternators, one for the engine and the other, a high-output 48V unit for the camper, wouldn’t the battery isolator and or the DC to DC converter be unnecessary?
Thanks,
Patrick
Hi Patrick, if you have a second alternator that’s already serving the role of charging your aux batteries then you would not need another charging device.
~John
Hey John. Great article. I am doing a bus conversion. I would like to use a DC to DC charger to charge my house batteries. The setup I would like to accomplish is like this: I would like to use 6 to 8 house batteries to run a small split unit AC, through an inverter, while I am driving. I am hoping that with 6 to 8 batteries and the DC to DC unit charging them through the alternator, that it will be enough power to keep the spit unit running while the engine is running. What is your opinion… Read more »
Hi Eric, thanks for reaching out. The first question that pops to my mind is how many amps is your AC unit drawing. To determine this, look at the wattage for your AC unit and divide by the system voltage (12V). For example, a 900W split unit would pull about 75A per hour (probably more like 80A once you factor in inverter inefficiency). In that scenario, a 60A DC-DC charger would only replace 60A while driving – so you’d have a drain of 20A per hour. Even with that, you could easily drive all day long and power your AC,… Read more »
This is good information. Thanks a lot. I have a 220 Amp alternator so I am thinking that will be big enough. Wiring multiple DC-DC chargers in parallel to increase the charging amperage is a good idea. I did see where Sterling makes a 120 Amp DC-DC charger which would probably be big enough. I will do some research into that. Thanks.
Thank you for the very informative and helpful article. I may be missing the obvious here. I understand how the isolator works when the vehicle is running and charging. Does it continue to function the same when the ignition is off. That is, when drawing power from the auxiliary battery, does the isolator disconnect the vehicle (starting) battery to prevent discharge? Thanks.
Hi Daniel, thanks for reaching out. Battery isolators detect when the engine isn’t running, and cut the connection to avoid draining your starting battery (they “isolate” the batteries, hence the name). Smart isolators (aka voltage sensing relays) sense the voltage of your starting battery. Once the voltage rises above a certain point (for example, 13.4V), the isolator knows that the battery is fully charged and the engine is on, so it opens the connection and charges your house battery. When the voltage drops below a certain point (say, 12.8V), then the isolator knows the engine is off and cuts off… Read more »
Does anyone know if the
2003 Chevy Silverado 1500 SS 1500 6.0L V8 has the (HALL-EFFECT SENSOR) Current Load on the GROUND CABLE from – post of starting battery to engine block?
I’m wondering if I need a Smart Battery Isolator or not. That’s what is holding me back from moving forward installing my 1,200 watt AGM battery.
Hi John
I’m new to the forum and have 3500 express and was curious of could I run a regular inverter (8000 watts pure sine) and install a battery isolater for second system ? To run four 12 amp freezers and tv ?
Hi Omar, you can certainly use a battery isolator to help you charge up your batteries while driving. However, if you’re running four freezers and a TV through an 8000W inverter you may need a pretty large battery bank that could be difficult to charge up from driving alone (this also depends on how much you’re driving). You may want to think about having another charging source, such as solar or even a gas generator.
~John
We installed our solar system and isolated our self’s everything works great except there is a whiny noisy under hood..could that be from something we did wrong
Hi Casper, it’s tough to say without being there. If it’s coming from the isolator then you may have a defective unit.
Hi John, I’m a total newb when it comes to 12 volt wiring. I definitely found your article very helpful and I would like to attempt to install an auxiliary battery to my 2000 Nissan Frontier 3.3L V6 truck camper. Weight is an issue and I am leaning towards a Lithium Iron Phosphate battery. My energy consumption is minimal as I would really only be powering some led track lights with a dimmable switch. I also would like to add a couple 120 volt sockets in order to power laptops. I am also thinking about adding a very small exhaust… Read more »
Hi Dave, so glad you’ve found our site helpful! The setup you’re describing should work fine with a 100ah lithium battery. As far as charging, make sure any sort of isolator/charger you use is set up for lithium batteries. For lithium systems, we usually recommend using a DC-DC charger like this one from Renogy (use the coupon code GNOMADHOME for 10% off). As far as whether you would need solar, I would say it depends on how frequently you’re driving and how long you’re out camping for. If you’re doing shorter trips and driving frequently enough, then that may be… Read more »
Hello how can I use the auxiliary battery to power the vehicles 12v outputs like the cigarette lighter outlets?
Hi Mohammed, to do that you would attach a fuse box to the battery and wire 12V cigarette lighter outlets to that. We have a more detailed explanation of how to wire a campervan electrical system here: https://gnomadhome.com/van-build-solar-electrical-wiring/
Hope that helps!
Hi John, Thanks for this great guide and for supporting it so well afterwards. The comments section with your responses are equally as helpful. I’m not a vanner, but wanting to rig up my Silverado for more camping. Wanting a sanity check on my plans before I buy everything if you don’t mind! 1) Truck has a 145A alternator so I think I’ll go Battery Doctor 150A, even though the Keyline would likely be perfect. 2) 150A Inline Fuse between the Isolator and the Aux Battery (which will be a short run, the truck came with a second battery tray)… Read more »
Hi Carl, so glad you found this guide to be helpful! Here are my thoughts on your setup: To connect to the 12V marine panel, the wire size should be based on the max current going that the panel will use. Looking at the Amazon listing, it appears that the max current it is rated for is 20A. For a long run at that amperage, I would use 8 AWG wire. Anything thicker than 8 AWG will be difficult to connect to the marine panel, just because of the types of connectors you will need. You will want to run… Read more »
I would like someone to help me, I am old and some how my ignition source came undone and I do not know nothing, is there anyone in Michigan or near me to hook it back up?
Hi Mary, sorry to hear you’re having trouble! I hope you were able to find someone to help!
If I use circuit breakers do I still need two , one for each battery?
Hi Daniel, we recommend having a fuse/circuit breaker near each battery to protect the batteries from shorts/surges. Hope that helps!
~John
What if I use an ordinary battery, not deep cell? I have an extra one.
Hi Nancy, I recommend going with a deep cycle battery (or a golf cart battery). An ordinary car battery will be way less than optimal for this usage. Ordinary car batteries are designed to deliver a large amount of amperage in a short period of time (to start a vehicle) and are not designed for deep discharge over a slower period of time. Deep cycle batteries are designed for deep discharge, and can deliver much more power over a longer period of time than a similarly-sized car battery. Hope that helps!
~John
~John
John, I’m connecting the Battery Isolator recommended in this article with the RV Tow Connector on my truck. I don’t have a trailer but am having a 7 Pin connector fabricated with only the Pos & Neg Pins used. Those 2 wires coming out of the connector will connect to the Isolator and then off the Isolator to my DX300 (DBOX12) Battery Box. I was thinking I won’t need fuses because the trucks 7 Pin connector should already be fused. You thoughts.
Hi Donald, I always tend to err on the side of more fuses. While the connector may be fused, most isolators recommend fusing as close to the batteries as possible. This would protect your batteries from shorts in the cable between your batteries and the trailer connector. Hope that helps!
~John
Aloha John, first off thanks for taking the time to post all this very helpful information, it’s awesome!! My question is this, I’ll be using my van for mostly weekend trips around Tahoe for camping and skiing and occasional music festivals, Do I even need solar panels or could I just get a few Lithium batteries and charge them from my house (i do have a 30 AMP outlet in my garage) and also install a battery isolator to charge them when I’m driving? I’ll have some puck lights, USB outlets, a Webasto Heater and occasionally use a induction cook… Read more »
Hi Barry, if you’re mostly doing weekend trips, you could certainly hold off on getting solar panels – as long as you have enough battery capacity to last you the weekend. An isolator can certainly help keep you topped off, but if you’re going to be mostly stationary the whole weekend then its value might be limited. Isolators tend to make the most sense if you’re doing a lot of driving from place to place, and idling your vehicle to charge up your batteries is not a good long term strategy. Side note: if you’re using Lithium batteries, you will… Read more »
Cool post, John!
One question:
Why did you go with two 150 amp circuit breakers (CBs) or fuses? I am estimating my current draw to be 20.5 amps. Would I want to use 30 or 40 amp CBs? Or would I want a 150 amp CB near the starter battery and smaller one by the leisure battery?
-Corey
Hi Corey, we went with 150 amp fuses based on the recommendations in the instruction manual for our isolator. However, it’s highly unlikely that that amount of current will ever pass through those fuses, unless there’s a short of some kind. Also, most leisure batteries should not be charged at a current higher than 30A-60A (depending on the battery). We need to update this post – if we were to do this today, we would go with a DC-DC charger (like these from Renogy) instead of a basic isolator. DC-DC chargers are capable of dealing with the voltage fluctuations of… Read more »
Thanks, John!
How is this unit connected having 3 secondary batteries?
Hi Bob, are you trying to connect an isolator to three secondary batteries? If you have three batteries, I’m assuming that they’re wired in series. All you need to do is connect the positive wire coming from the isolator to the positive battery terminal that you’re connecting everything else to (with an inline fuse close to battery). Hope that helps!
~John
Hi John, thanks for the great information! I do have one question though. Most deep cycle batteries (including the one you added a link to) have a max charge current of around 30-40 amps. I believe alternators can put out well over that and the isolator states 140 amps. Do you know if this is bad on the batteries to be charging with that much current, that fast?
Hi Camron, great question. My understanding of it is this: most people recommend sizing a battery isolator based on your alternator output. Let’s say your alternator puts out 140A – that does not mean that it puts out 140A at all times, or if it does that all 140A goes to your aux battery. A good chunk of that is going towards powering the electronics in your vehicle, then is going towards topping off your starting battery, then is going back to your aux battery. On top of that, alternators are designed to only supply the necessary current to achieve… Read more »
Hey! I have just installed the key line battery charger in my van exactly as per instructions, but now my vehicle engine will not start! The vehicle lights still come on so I’m not sure that the starter battery is dead. Is there anything I may have missed? There’s not much information online about troubleshooting the product. Thanks!
Hi Moll, sorry to hear that you’re having troubles! If everything is wired correctly, the first thing I would check is that all of your connections are tight. A loose connection to your starting battery could cause it to not work properly, and could also drain the battery (it can be drained below the level of being able to start your vehicle without being fully dead). If everything is tight, you may have drained it during the installation (which could happen if the terminal was making contact with metal somehow – i.e. the wire crept back and made light contact… Read more »
John – I’m using the keyline coupled with solar. If the starter battery and isolator are both grounded – Can I skip grounding my aux battery? I always assumed I would, now that I am ready to install, not so sure. I see various opinions about it.
Hi Jerrod, in general we recommend grounding your aux battery for safety. The wiring diagram for the Keyline isolator also shows the aux battery negative terminal wired to the vehicle chassis. Hope that helps!
~John
John – If the keyline and house battery are grounded, will the inverter use the battery ground, or would we also ground the inverter to the chassis?
Essentially having all 3 items grounded to the chassis somewhere?
Sorry I’m new to the electrical side of Van Life and this question may be dumb: Can I use this process of alternator charging and a battery isolator with such power stations as the Goal Zero Yeti or Inergy Apex systems? or just “traditional style” deep cycle batteries? I’m planning my build as much as possible and I don’t think I will initially need solar but I do believe I’ll need more than just a 12 Volt car charger set up you know? Thank you for any information and advice.
Hi Amanda, thanks for reaching out! I don’t have direct experience connecting a Goal Zero or similar product to a battery isolator, so unfortunately I can’s offer much insight. However, Goal Zero specifically has an add-on product called Goal Zero Link that allows you to connect a Goal Zero to your vehicle’s battery system much like an isolator would do. Here’s a video with more details on how that setup works: https://www.youtube.com/watch?v=Zl-5qq9hPOg
Hope that helps!
Thanks,
John
Someone suggested i needed a solenoid and that is why my house battery is not charging then someone else said an isolator. Confused? Suggestions?
Hi KB, a “solenoid” in this context is a type of battery isolator. Solenoid isolators are basically mechanical switches that opens a connection to your aux battery when there is an electrical current present. Solenoid isolators are inexpensive, but they require tapping into a hot power wire in your vehicle to install them. We recommend going with a “smart” battery isolator, AKA a voltage-sensing relay. This type of isolator is essentially a small computer that senses the voltage of your batteries and cuts in/out appropriately. They also have the ability to do multi-stage charging of your aux battery. Smart isolators… Read more »
Jon, I’m wondering if you have any tips about wiring when you do BOTH the keyline isolator AND the solar panels Like I only have one battery and so, forgive me if this seems illogical, but I wondered if a) it’s okay, for both to be in the same circuit loop (meaning the battery isolator’s wires go on on a fuse box, and so do the do the solar wires) or b) it makes a difference to wire the isolator directly on the battery as apposed to the fuse box) Cheers, Ben p.s. if you want a visual, I copied… Read more »
John*
Hi Ben, thanks for commenting! I took a look at the link you provided. First off I must say that I’ve never seen an off grid electrical system wired like that before. Typically, your charge controller is wired directly to your battery (with an inline fuse on the positive cable). There is then a separate set of wiring connecting the charge controller to your 12V fuse box. The way the fuse box is wired in that system is functionally the same as wiring it directly to your battery, which should work fine, but not going through your charge controller means… Read more »
That does help a lot!
I think you explained why I’m not able to get my battery back up to the higher end of charge sometimes due to not high enough voltage to take deep cycle past bulk stage.
I’ll rewire your suggestions.
Cheers,
Ben
Hi John, thanks again. Follow up question now that I’m wiring: what is the difference between grounding the various items to the car frame vs. going to the battery. From searching the web all I find is that it’s more convenient but ultimately they are all connected. I wondered if there is any protective aspect to not grounding everything on the battery, but figured the grounds all connect to one another.
Hi Ben, as far as the battery isolator is concerned, grounding it to the vehicle chassis essentially saves you the hassle and expense of running another thick battery cable all the way back to the aux battery. The vehicle frame is basically one giant blob of wiring, and it’s very common in vehicle electronics to use the vehicle frame as the negative return path. In this case, you also need a common ground for the battery isolator, aux battery, and starting battery, and grounding to the chassis simplifies things quite a bit. As far as your inverter goes, you could… Read more »
Thanks John, very helpful. I rewired things a good bit. I have been watching my battery isolator (keyline) and notice that it takes my 12 volt 100 amp renogy battery from 12.3 volts when the car was off, to 13.2 volts when the car is on. This is an example from today when I took an instantaneous measurement by volt meter and turning on and off the car to see the difference. I haven’t felt like it’s been charging my battery as quickly as when I first installed it. What do you experience or what’s the right way to quantify… Read more »
This may have been answered already (I couldn’t find it in the thread)… we are going to run two 100Ah LiFePO batteries. Can we use one battery isolator to charge both of the LiFePO auxiliary batteries?
Hey Mark, thanks for commenting@ Yes, you can use a battery isolator to charge two batteries since your batteries will be wired together. Just attach the wire from the isolator to the positive terminal of one of the batteries. Hope that helps!
~John
I had the Keyline isolator, but it somehow got fried (one of the terminals somehow is loose), and so I got the Wirthco isolator, and it’s having issues (see below if you want the details). When I called Wirthco they said it’s cause I am running a two battery system. Have you had any issues with a two battery system? Details: my batteries were dead, which I how I first realized I had a problem. The Wirthco isolator kept blinking, and to get it to stop, I charged each battery individually. Then I hooked them back together, it seemed to… Read more »
Hi Katie, so sorry to hear that you’re having issues! We have not had similar issues with ours. I personally don’t understand how having a two battery system would affect anything since they’re wired together. However, a handful of readers have reached out to us recently regarding other issues they’ve experienced with their Wirthco isolators, and we’ve chosen to remove this product from our website while we reassess our recommendation. Sorry again that you’ve been having issues!
~John
Thanks for the feedback and all you do for the vanlife community! I’ve benefited greatly from your efforts.
Are you still happy with the Battery Doctor? Based on Amazon reviews, it seems as though there are reliability issues with both but the Keyline has a longer warranty period (1 year versus 1 month).
Hi Richard, we haven’t had any issues with either the Battery Doctor or the Keyline. We started with the Keyline and had that for over a year. Then we switched to the Battery Doctor due to its ability to reverse the flow, and we’ve had that for over a year so far. I will say that the Keyline definitely seemed more robust/durable, and it seemed like it did a better job driving voltage to our house batteries. Another option to look at is the Blue Sea Systems Automatic Charging Relay. We’ve since developed a short in the wiring under the… Read more »
What is the reason for installing the B2B charger in the main engine area or close to the van battery? Could the B2B Charger be installed in the rear of the van by the rest of the electrical components?
Hi Travis, the manufacturers’ instructions for these battery isolators say to install them in the engine bay. My guess is it’s because the isolator needs to be grounded near where the starting battery is grounded, but I’m not positive.
~John
Hello! I’m completely clueless to anything electric and was wondering where I should look for help with this. I was thinking car audio shop? Any ideas on what to even google to find some assistance? Also what kind of power are you going to get from this? I really am in need of some type of AC, was considering a swamp cooler so I would just need power to run a 12v fan. Halp!
BTW love you guys, thank you so much for all this valuable and FREE info! Y’all are awesome!
Hi Monica, thanks for reading and for the kind words! Electrical can definitely be intimidating when you’re first getting started. I’m honestly not sure where’s the best place to look for professional help, but you could certainly try a car audio shop. They should have at least some experience with 12V vehicle electronics, running wires from the engine bay to the rear, and wiring things to your battery. It certainly couldn’t hurt to ask. As far as the amount of power you can get, it’s all going to come down to your battery capacity. More batteries = more ability to… Read more »
I ordered the 75-100 battery isolater my battery is a 100 ah batter says max amp charge is 30 amps so would I need a smaller isolater
Hi Kyle, you shouldn’t need a smaller isolator. Both the Keyline and the Battery Doctor isolators that we mention are “smart” isolators that are designed to charge deep cycle batteries with multi-stage charging. Hope that helps!
~John
Happy I found this I wanted to add a battery to battery set up in my 18 transit I just ordered everything u guys used and am gonna copy u… I’m new to all this so I asked on forums for help and everyone was confusing the crap out of me saying battery’s have to have the same chemistry and this is. Isolater not a charger blah blah I’m only running a maxfan water pump andfew usb outlets so I ordered a 100ah battery to supply them … so I hope this works for me seems pretty straight forward I… Read more »
This is a great site! I am finding so much useful information. Thank you for sharing! I have a ProMaster 2500 159. It has a 180 Amp Alternator. Do you think this witch 150 would work for me?
Hi Chris, so glad the site has been helpful! Here is my understanding – even though your alternator is 180A, it’s not sending all of that to the battery (the other electrical components in your vehicle are also receiving some of the current). Given that, a 150A isolator should be perfectly fine for most vehicles and alternator sizes. Hope that helps!
~John
Thx! Great article, as usual for your site. What I don’t know is how you determine what amperage you need for the isolator and the fuses. Is it based on the alternator amps, or what? And how do you choose a fuse that is neither too high (as to properly protect) or too low (being tripped when you don’t want it to be)?
Thank you so much for all this useful information! We would be lost without you guys!
Of course, so glad we’ve been of help!
~John