If you plan on going off grid for any length of time, you need water in your van. And if you like to cook as much as we do, you’ll also want a sink for washing dishes and a way to catch waste water. But how do you go about setting all of this up?
The water system was a big area of confusion when we started our van build. We knew we wanted an actual sink with running water of some kind, but we didn’t know the best way to make that happen.
Plumbing can be a bit like an electrical system: overwhelming and intimidating if you don’t know what you’re doing. But once you get your bearings, it’s really not that difficult.
Every van water system has the same basic components:
- Fresh Water Tank
- Water Pump
- Faucet and Sink
- Grey Water Tank
- Plumbing/Tubing
In this post we go over the water system in our van, how we decided what components to use, and exactly how we installed everything.
What We Used in Our Water System
- 14-gallon Stainless Steel Fusti Tank and Ball Valve Attachment
- Whale Water Systems MKIII Gusher Galley Foot Pump
- Whale Water Systems Telescoping Faucet
- Kingston Brass 16” Stainless Steel Bar Sink
- Houzer 2″ Bar Sink Strainer Basket
- Sink Strainer Tailpiece (cut short to fit into grey water container)
- 5-Gallon Plastic Hedpak Container
- ⅜” ID Flexible Beverage Tubing
- ½” ID Flexible Beverage Tubing
- ½” to ⅜” Barbed Reducer Coupling
- ½” – 1-¼” Hose Clamps
- ¾” Conduit Straps
- Plumber’s Putty
- Husky Light Duty Steel Anchor Points
- 1” Tie Down Straps
- ¾” Self-Tapping Screws
- 1” Pocket Hole Screws
Choosing a Freshwater Tank
There are a lot of options out there for freshwater tanks in a van build, but pretty much all of them have one thing in common: they’re made out of plastic.
And we personally don’t like the idea of our drinking water sitting in contact with plastic for extended periods of time. We still remember when BPA was considered safe, so who knows what other harmful chemicals can leech into our drinking water from a plastic tank.
Plastic water tanks do have a lot of advantages. They’re relatively cheap and widely available. There are many different shapes and sizes, from easily-replaceable 5-gallon water cooler jugs to full-blown RV water tanks. Most people go with some sort of plastic tank for their van build. Still, we really wanted to find something other than plastic, so the hunt was on for a stainless steel tank.
And man, is it difficult to find a water tank that’s not plastic! We spent weeks searching around on the internet, and we couldn’t find anything that didn’t need to be custom-fabricated.
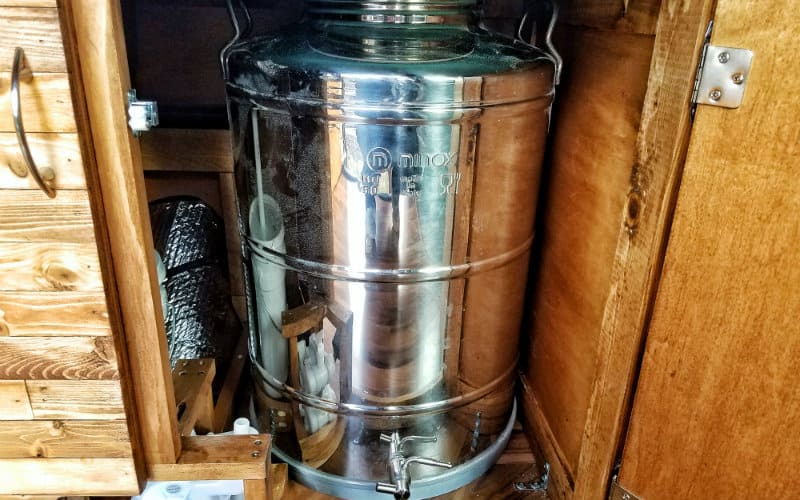
Then we stumbled upon this 14-gallon stainless steel fusti tank on winemaking supplier MoreWine.com and we knew it was perfect. The fusti tank is more expensive than most plastic tanks, but we think it’s worth it (if you decide to go with this tank, make sure to buy the ball valve attachment also).
Choosing a Water Pump
Water pumps generally come in two different varieties: electric and manual.
An electric water pump will give you actual running water in your van, but it’s also one more component to add to your electrical system install. And when you have actual running water, it’s a lot easier to just let it run and waste a ton of water in the process (I was notorious for leaving the sink running unnecessarily at our house).
So for us, a manual pump was the way to go. Not only would it be simpler to install, it would also help us conserve water. And when you’re living off grid in a van, water conservation is incredibly important.
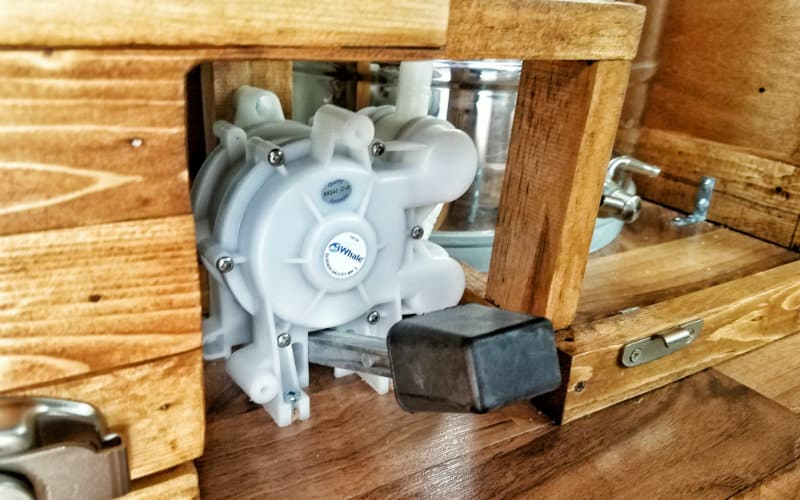
After searching around, we settled on the MKIII Gusher Galley Foot Pump from Whale Water Systems. Whale makes a lot of great products for marine use, and components made for boats also work perfectly in vans. Plus, having a foot pump means we can keep our hands free for washing dishes.
Choosing a Sink and Faucet
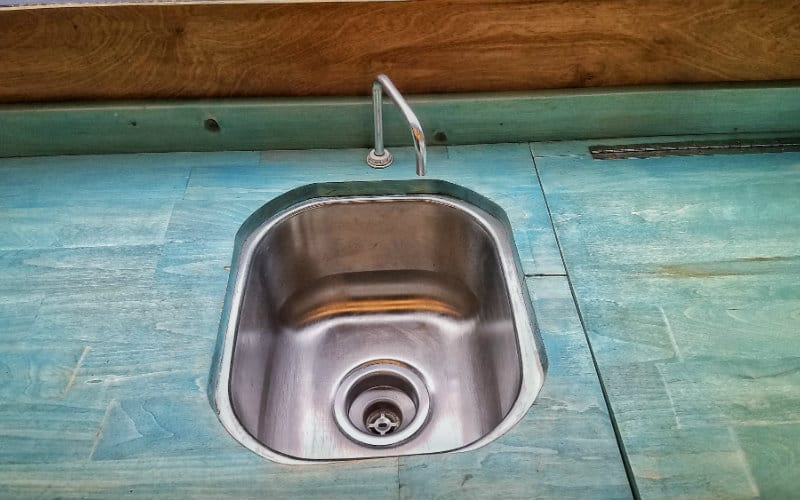
Since we were using a foot pump for our water, we didn’t need a faucet with any sort of hand controls. It was a no brainer to go with Whale System’s telescoping faucet, since it’s built specifically for use with Whale foot pumps.
For the sink, we wanted something big enough to do dishes in easily, but not so big that it would dominate our limited counter space. We found a 16” stainless steel bar sink on Amazon that was the perfect size.
What to Use for a Grey Water Tank?
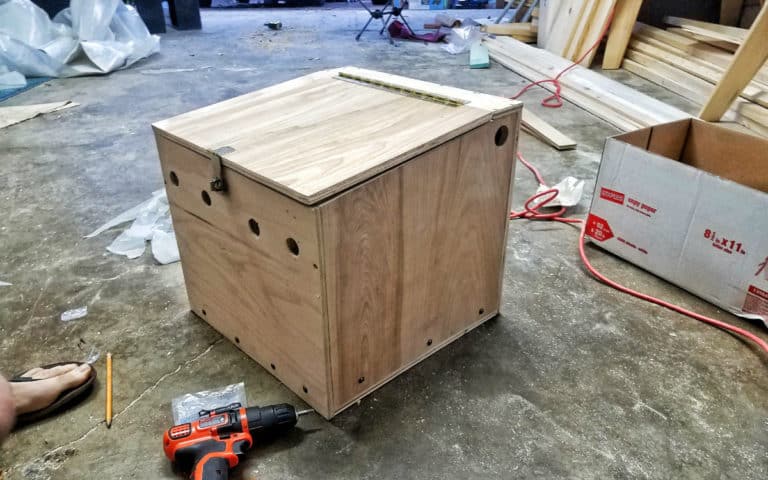
Our original idea for a grey water tank was simple: get a 5-gallon Homer bucket and lid from Home Depot, cut a hole in the lid for the drain pipe, and ratchet-strap it to the cabinet under the sink. It sounded great in our minds, but it didn’t end up working out too well.
First, we miscalculated the amount of space we had to work with. The Homer bucket fit perfectly under the sink, but we couldn’t get it through the cabinet door opening. Not good for something we need to take out and empty regularly. So we bought a smaller 2-gallon bucket and lid on Amazon to use instead, and that’s what we hit the road with.
And we immediately knew it was a problem. The lid didn’t seal properly, it was tough to remove it from the van without spilling everywhere, and the small capacity meant we had to stress out finding a place to dump it way too frequently.
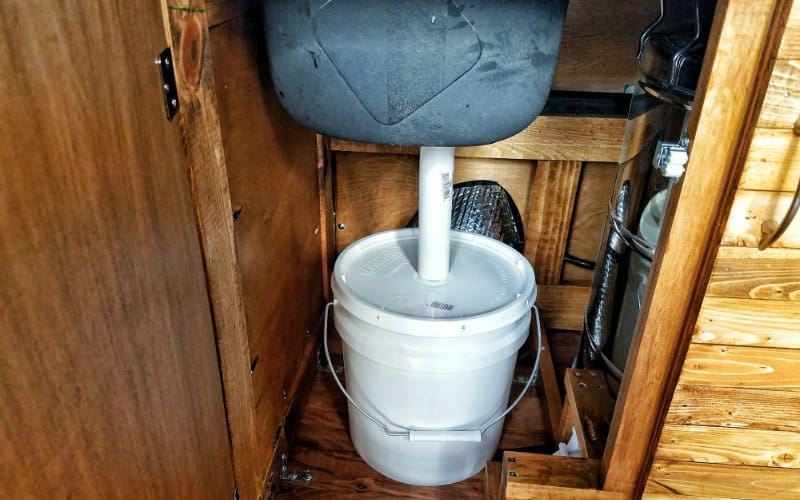
We ditched the bucket as soon as we could, and found this 5-gallon plastic hedpak container that fits perfectly under our sink. With 5 gallons of grey water capacity we only need to worry about dumping it every 3-4 days, and the smaller opening means we have much less splashing and spilling.
Plumbing Everything Together
Now that we had compiled all the pieces, we had to figure out the best way to connect them together. There’s just not a whole lot of information about this out there on the internet, so we had to experiment with different options.
We first tried using PEX pipe, which is the standard in residential plumbing. PEX is cheap and easily available, but the downside is that you need crimp connectors and a special crimping tool to work with it, which adds to the cost.
And we quickly discovered that PEX just wouldn’t work in our van. Our components needed tubing in ⅜” ID (inner diameter) and ½” ID sizes. But those are nominal sizes not actual sizes, and different types of plumbing have different actual size standards. So the ½” PEX ended up being too small for the ½” hose connections on our foot pump.
After some research, we settled on flexible beverage tubing. Beverage tubing is made for plumbing beer, water, and soda lines. It’s food safe, easy to work with, and flexible enough to stretch over any fitting.
Hooking Up Our Van’s Water System
Installing the Foot Pump
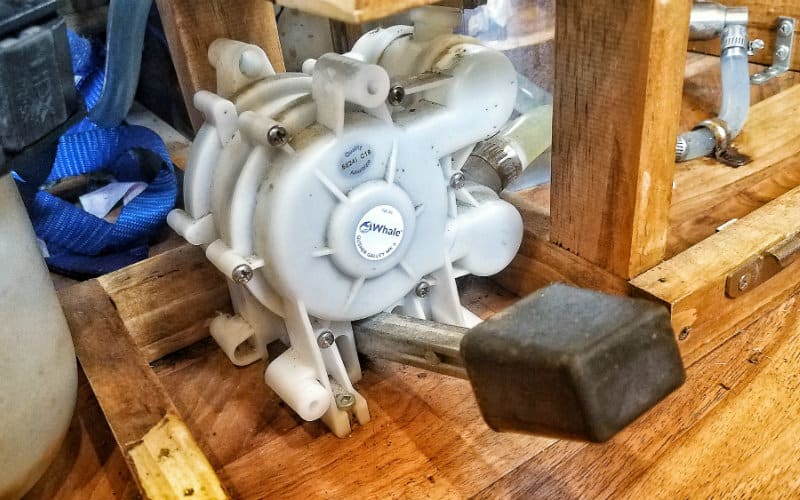
We made our awesome kitchen cabinets with a purpose-built inset for our foot pump, and we also pre-installed the sink and faucet into the countertop. You can read about how we did all that here.
Before installing our kitchen cabinets in the van, we dry-fit them and marked exactly where the foot pump should go. We then took the cabinets back out and screwed the foot pump down to the floor using 1” screws.
After we permanently fixed the cabinets into the van, we popped in more screws connecting the foot pump directly to the cabinet for extra security (all these screw holes come pre-drilled into the foot pump).
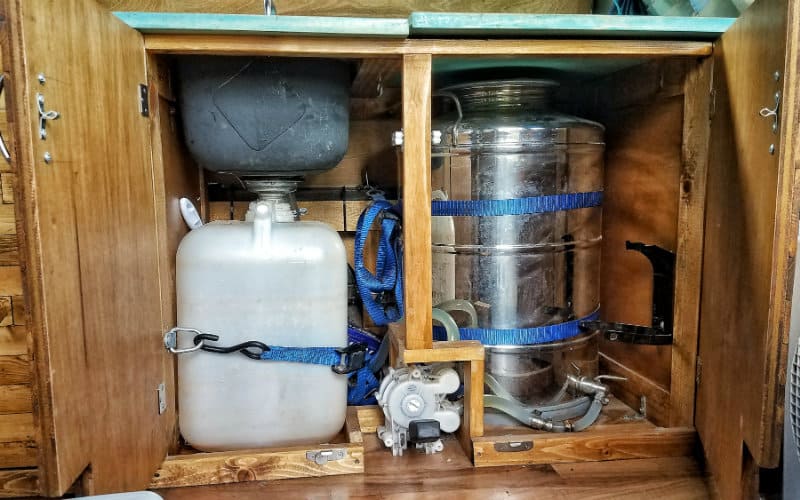
Installing the Water Tank
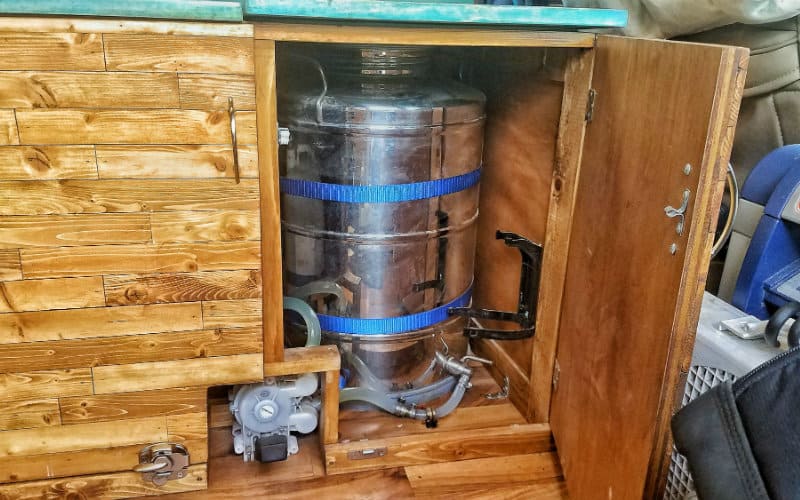
We designed our kitchen with the water tank compartment on the far right side, just behind the driver’s seat. So that we don’t have a 100-lb fusti tank sliding around inside our van, we first installed four steel anchor points on either side of where the tank goes using ¾” self-tapping screws. That way we could hold the water tank in place with two 1” tie down straps.
Next, we screwed the ball valve attachment into the opening at the bottom of the fusti tank (this is much easier to do before the tank is installed). Then, we dropped the tank into place and strapped it down.
Hooking up the Tubing

The ball valve coming from the fusti tank accepts ⅜” hose, while the connector for the foot pump takes ½” hose. So, we needed to install a ½” to ⅜” reducer coupling.
First, we attached a few inches of ⅜” hose to the fusti tank and secured it with a hose clamp. Then we added the reducer coupling, and ran ½” hose from the other side of the reducer to the intake connection on the foot pump. We secured all these connections with hose clamps.
The faucet also takes ½” hose, so we just ran another hose from the output connection on the foot pump right up to the faucet, again securing the connections with hose clamps.
Finally, we strapped the hose down to the floor and cabinet frame at several points using ¾” conduit straps. This prevents the hose from moving around while we’re driving and takes the stress off the connections. We definitely don’t want to bust a hose and have 14 gallons of water pour into the van!
Sink and Drainage
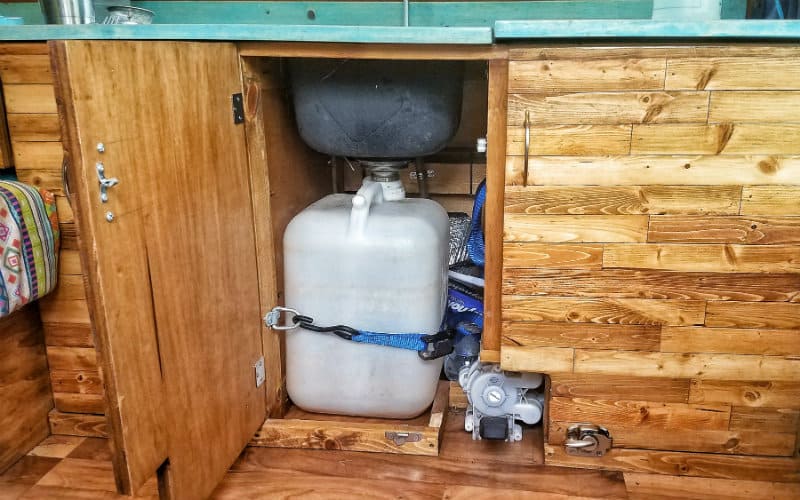
First, we used plumber’s putty to install the strainer basket in the sink. Then we attached the sink strainer tailpiece to the underside of the strainer. We also cut the tailpiece short so it extends just an inch or so down into the plastic grey water container.
Next, we test fit the grey water container and marked spots to attach steel anchors points to the cabinet on either side of the container. We screwed the anchor points down using ¾” self-tapping screws, and strapped in the grey water container with a 1” tie down strap.
We Couldn’t Be Happier With our Water System
Our whole sink and water setup is one of our favorite features in our van. The stainless steel tank gives us great peace of mind, and the 14-gallon capacity (plus our 6-gallon reserve container that we stash in the trunk) means we can be off grid for about a week without refilling water.
Plus we don’t think we could ever go back to not having a foot pump. It’s just awesome using your feet to control your water flow, and the manual pump makes it easy to use only the water we actually need. Now when we use regular sinks we frequently catch ourselves trying to pump water with our feet!
For more build guides and vanlife tips, be sure to follow us on Instagram @gnomad_home and on Facebook. Cheers!


Hi there, how’s the water tank holding up after all this time? Any rust or other issues? I also try to avoid plastic containers for everything, especially water and food. Thanks!
Hi Sid, no issues with the water container! The biggest issues with usability, however, are that this container is taller than most, and round, so that creates natural limitations on building around it that a rectangular plastic container would not have. Also, the way we filled it was by dumping water in the top, which sometimes led to spillage if we weren’t careful. However, I’m sure there are easier ways to tackle that. Hope that helps!
~John
Hi, thanks for your article! I have also bought the wale gulley gusher and was planning to secure it by screwing it down into our 12mm ply floor, but was concerned that in time the screws may work loose in the ply. Have you found that your has loosened at all or is it still strong and stable? Thanks!
Hi Matthew, we have not had any issues with stability. The pump also has holes to screw it to something behind it as well, so we secured it to our kitchen cabinet in addition to the floor.
Hope that helps!
Hi, what was the cost of this setup? Thanks!
Hi MJ, we spent about $450 on this setup. The tank cost about $160 and the foot pump about $100, and you can shave costs on other components (i.e. using a salad bowl for a sink instead of an $80 bar sink like we used). Hope that helps!
After a year of stop and go literally having ankle replacement surgery and a long road back to walking again. And watching a zillion van builds all with newer vans all the while owning an older 04 gmc Savana conversion hitop, my perspective is off size wise. Anyway got base cab and sink in waiting for faucet and plumbing with pump; floors in fans on the way ceilings coming down on to insulation. Been racking m6 brain with every kind available and due to limited headroom seems 1/2” poly the way to go. Question – foil up On the fiber… Read more »
Hi Paul, thanks for commenting! Foil insulation doesn’t do any good unless it has a minimum 3/4″ air gap between it and anything else. Foil up against the ceiling won’t do anything, and it also won’t do anything if you put other materials right against the foil. If you’re using foil-backed foam boards, I would say to face them inside. The foil won’t have a huge insulating effect without an airgap, but it does have some effectiveness as a vapor barrier. Reflectix is not very effective as in-wall insulation, but it is very effective as a reflective barrier on windows,… Read more »
How do you clean the tank?
Hi Carl, we generally only fill it with reverse-osmosis filtered water, so we have not needed to clean it. But if we needed to, the tank is quite light and easily removable when empty, so it would be a matter of quickly removing it from the van and cleaning it out. Hope that helps!
~John
How’s the tank been working for you? Seems like a good choice but would like to know based on your experience!
Hi there, the tank has been working out great! It makes us a feel a lot better not having our drinking water sitting in plastic all the time. There are a couple things I would note about our setup that would be easy to improve upon. First, because of where the valve is on the tank, it’s functionally only about 12 gallons, since the last two gallons at the bottom won’t actually pump out. This would be easy to fix by adding a tube on the inside of the tank that allows you to pump out the bottom of the… Read more »
Thanks for the questions, I was about to ask the same about the water tank.
Do you guys use anything to deoderize your grey water tanks? We’ve been noticing ours smelling pretty quickly but I’m not super excited about dumping chemicals down it. Was wondering what you guys use to control the smell?
Hi Allison, we actually haven’t had much problems with smells from our grey water tank. We originally had a plastic container under our sink that we would remove and manually dump out. It would definitely dirty after awhile, but whenever we had the chance we would rinse it out with a hose and spray a little vinegar into it. We recently switched to a grey tank mounted under our van (homemade from 4″ PVC pipe), which makes cleaning it a lot tougher. When we installed this, we made sure the plumbing included an S-trap style bend, which theoretically should prevent… Read more »
Isn’t it a bit difficult to fill up the 14 gallon tank? That would be really heavy. And getting it out from under the counter?
Hi Julene, thanks for reading! The 14 gallon tank stays in the van at all times. We have a 6 gallon water jug that we fill up and pour into the 14 gallon tank. Once that’s full we fill up the 6 gallon jug again and stick it in the trunk, so we carry 20 gallons with us. Hope that helps!
~John
how exactly do you refill it? Do you remove the straps and pull it out to fill it with the 6 gallon jugs?
Hi Cal, the water tank would be much too heavy to move when filled, so it stays put. Part of out countertop flips up to expose the water tank. We then unscrew the top and pour water in from one of these 6-gallon plastic jerry cans. You could also run a hose into the van and fill using that. Hope that helps!
~John
I can’t tell from your pictures, do you just not use the lid for your greywater container and not worry about rough road splash? The mouth on those containers is 2.5 inches but the tailpipe is 1.5 inches Or did you cut a hole in the lid?
Hi Tam, thanks for reading! We didn’t use the lid for the greywater tank. as long as we stayed on top of emptying it (every 2-3 days) we haven’t had any problems with water getting out. We recommend this setup highly, but we no longer have this. Over the spring we drilled a hole through the floor and installed a straight drain under the van. Hope that helps!
~John
Hi! Do you have that info anywhere on the site that I missed about drilling out of the van? So you no longer have a gray water tank? Thanks so much!
Hi Laura, we haven’t done a write up on this yet. While we did drill through our floor with the goal of installing an external gray water tank, it’s been kind of an evolving situation that we’re still working on. Hope that helps!
Is there anything you do (before or after) to keep the water fresh inside the steel container? Is the container filled with tap water?
Hi Spencer, we typically refill our water at the water stations inside Walmart and some grocery stores. The water there is triple filtered, and usually about $0.37 per gallon if you bring your own container. We’ve also occasionally refilled our water at campgrounds. We don’t have any kind of water filter for those instances, but we are looking into options for filtering water before it goes into the tank – as well as a means to filter water in the wild so we can boondock for longer (we’ll probably get the Sagan Aqua Brick water filter very soon). Hope that… Read more »
Great post! Is it difficult to remove the greywater container when you have that sink strainer tailpiece an inch or so deep into the container? How do you work around that?
Hi Robert,
Glad you enjoyed the post! It’s actually not that difficult to remove – as long as it’s not too full. We just angle the bottom towards us until the top clears the pipe, then slide the whole thing out. The real trick, though, is making sure to check it regularly so it doesn’t get too full. We can usually go 2-3 days before we need to empty it, but I recommend making a habit of checking it every time you do dishes. Trust me, it’s A LOT more difficult to empty when it’s overflowing!
~John
Hey, love the website and the great information you have provided! Did your foot pump make your water taste awful? If so, did you do anything to help it?
Hey Mike, glad you enjoy the site! We did have a little bit of plastic taste at first, but I can’t say if it was from the foot pump or the vinyl beverage tubing we used to connect everything. It went away on its own within a few days. I’m not sure how to prevent that other than thoroughly rinsing everything before installation. Hope that helps!