Without water and a way to cook food, living in a van just wouldn’t be possible. Buying food and drinks at restaurants and gas stations all the time is not only unhealthy, it’s also expensive. So, one of the most important parts of any van build is the campervan kitchen setup.
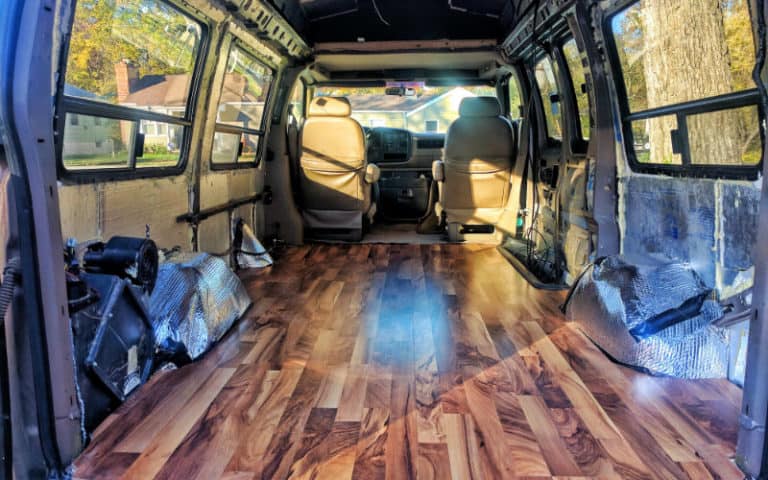
Our kitchuation (…kitchen situation…get it?) houses our van life water system, which includes sink, faucet, foot pump, and water tanks. It also has storage areas for our stove, dishes, utensils, pots and pans. The big countertop gives us plenty of space to prep food, cook, or work, and in its off time it doubles as a structural support for our pullout queen-sized bed frame. And it looks pretty damn sweet, if we do say so ourselves :-).
Since our kitchen cabinets are so customized for our particular setup, the specific instructions here may not work for your van without modification. But, we hope you’ll find some inspiration and ideas in how we built and arranged everything. We have plenty of tips and tricks that you can use in designing your own van kitchen.
Figuring Out Where Everything Goes
We had quite a few items we wanted to include in our kitchen, so first and foremost we had to decide how everything would be laid out inside the cabinets. Here’s what we were working with:
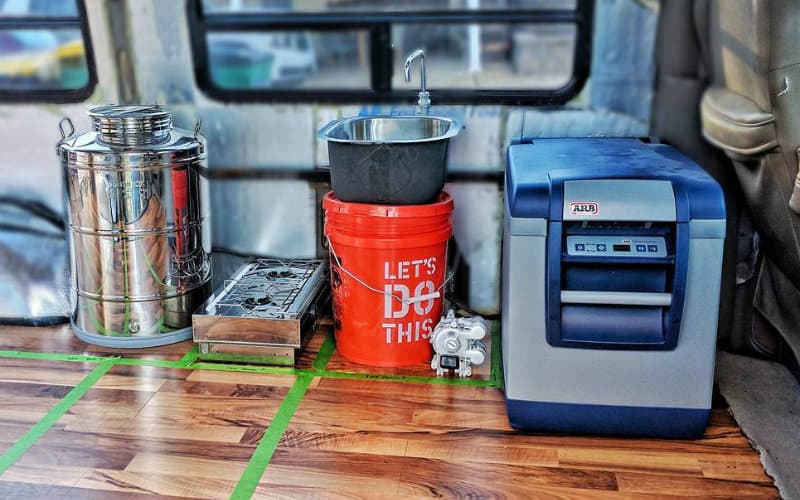
- ARB 50-qt Fridge/Freezer
- 2-burner camo stove
- 14-gallon Stainless Steel Fusti Tank
- Whale Systems Gusher Galley MKIII Foot Pump
- Whale Systems Telescoping Faucet
- Kingston Brass 16-inch Bar Sink
- 5-gallon Drainage Container
- Pots, pans, tupperware, plates, bowls, and utensils
We did several dry runs in which we arranged the items where we thought they should go in the van, and kept rearranging them until we settled on something that made sense. This really helped us optimize the space in our kitchen.
Our original plan was to include our awesome portable 12v refrigerator in the mix and put it under the countertop behind the driver’s seat. But that proved to be a little too cramped for our space, and it left no room for kitchen storage.
However, we discovered that the ARB fridge fits perfectly between the two front seats. We weren’t the biggest fans of this option at first for a few reasons:
- We wanted to leave this open as a spot for the dogs to lay while we were driving.
- Getting to the back of the van without going outside would be challenging.
- It would pretty much eliminate the option of upgrading to swivel seats down the road.
But, it ultimately turned out to be the best spot for the fridge. It just frees up so much space in the kitchen and it makes good use of what would otherwise be dead space. Crawling over the fridge to get to the back isn’t that bad, it gives us another surface to put things on, and it can even serve as an additional seat in a pinch.
We also quickly found out that when the dogs are up front, they like to hop up on the dash and look out the window or just mess with us while driving. Nymeria always wants to be in someone’s lap, and Crow wandered down by the driver’s feet a few times hunting for food. Definitely not safe!
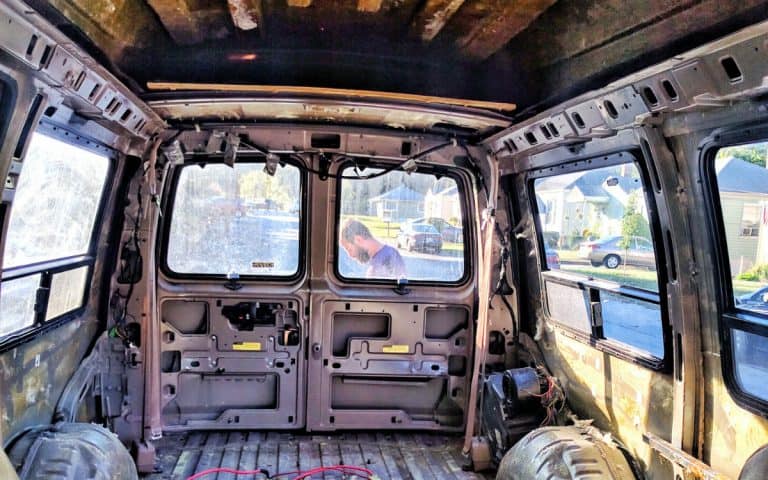
Blocking Out our Layout
Once we figured out where we wanted everything, we put painter’s tape down on the van floor to block everything off and give us an idea of the layout so we could design the frame.
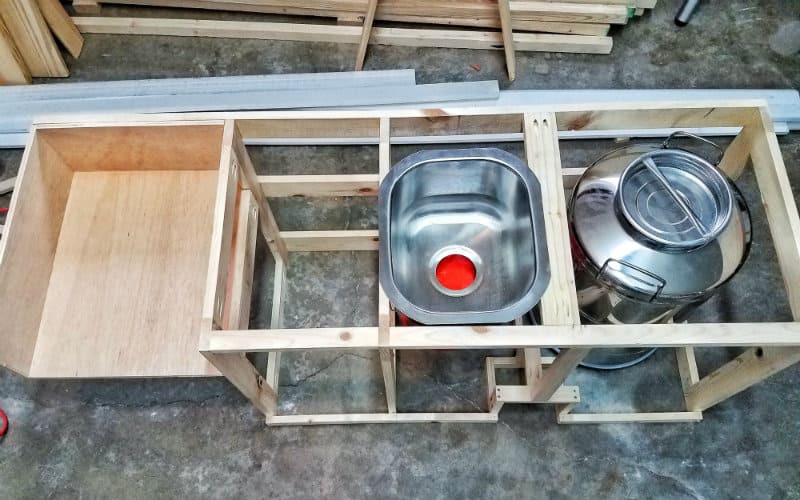
We decided that the water tank would go right behind the driver’s seat, followed by the sink/faucet/drainage container. Next would be a storage cabinet for our kitchen stuff, then a small cubby to store the stove. This cubby would float over the storage bench, and underneath it would be a gap for a cushion when the bed is in couch mode.
We put a lot of thought not just into how our kitchen would be arranged, but also how it would fit with the storage bench and pullout bed frame as part of a cohesive design for the living area.
Building our Kitchen Cabinets
What We Used to Build Our Cabinets
Frame and Counter
- 1×3 lumber
- 1×2 lumber
- ½” Birch Plywood
- ¾” x 24” x 72” Edge Glued Panel
- Titebond II Wood Glue
- Kreg Jr R3 Pocket Hole Kit
- 1-¼” Pocket Hole Screws
- 1” Pocket Hole Screws
- 1-¼” GRK Trim Head Screws
- 12” Piano Hinge
- Jigsaw
- Cordless Drill
- 1-¼” Spade Bit
- Chisels
- Clamps
- 1-½” Angle Brackets
- ¾” Self-tapping Screws
Cabinet Doors
- ½” Birch Plywood
- ¼” Pine Lath
- Cabinet Door Pulls
- Cabinet Catches
- Cabinet Hinges
- Sliding Window Sash Locks
- Slide Bolt
- ⅝” Wire Brads
- Hammer
- Nail punch
- Detail sander and sandpaper
Stain and Finish
- Varathane Gel Stains
- Provincial, Golden Pecan, Ipswich Pine, Dark Walnut
- General Finishes Gel Stains
- Colonial Maple, American Oak, Nutmeg
- Vintage Aqua Varathane Wood Stain
- Watco Butcher Block Oil
- Minwax Wipe-On Polyurethane
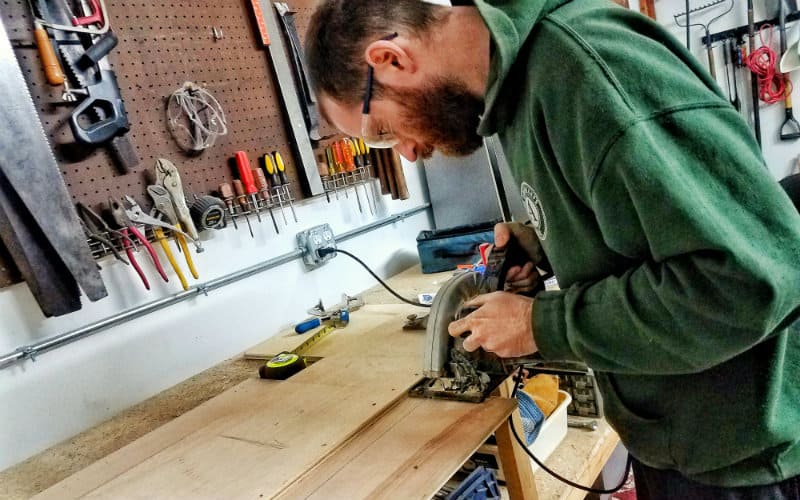
Building the Frame
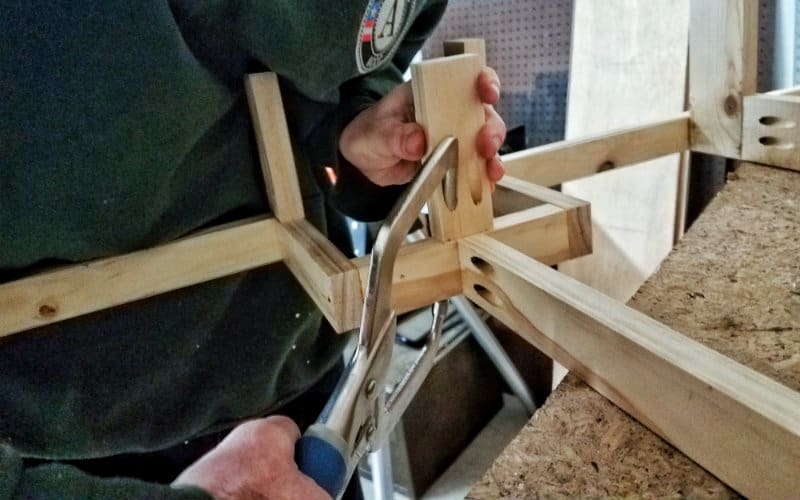
Once we had our measurements, we began constructing the frame out of 1×3’s fastened together with pocket holes.

Pocket holes are a way of joining wood together that’s incredibly strong, lightweight, and easy to do. In fact, we wrote an entire blog post about why pocket holes are so awesome. But, they do require a special kit to make them.

We first screwed together rectangular frames to separate each section. Then, we attached them into a larger frame by screwing some 1×3 cross pieces across the back.
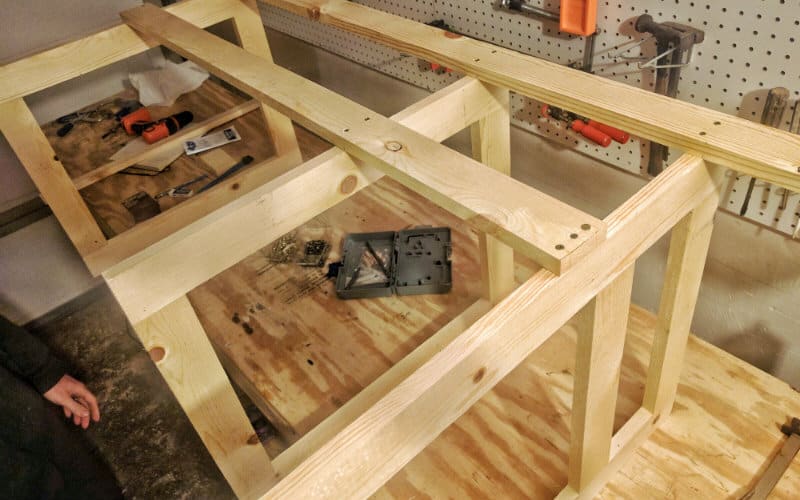
We also attached 1×2 lumber along the front – the pieces along the top help hold the frame together and also add somewhere to screw the countertop to, while the piece at the bottom also helps hold everything together and adds a lip at the bottom of the cabinet.
A 1×3 piece separates the sink section from the water tank and gives the sink and water tank lid somewhere to rest.

The partial cabinet for the stove is essentially a plywood box screwed together with pocket holes, and attached to the rest of the frame by the rear crosspiece. The bottom of the box is also screwed down to a shelf on the frame next to it.
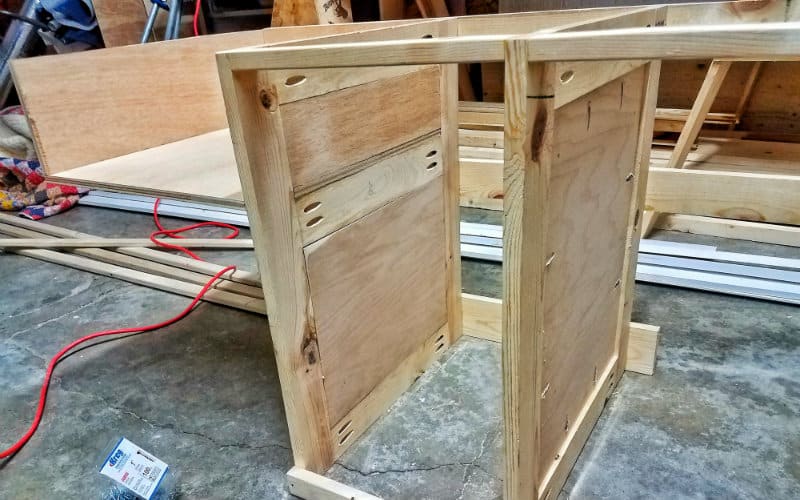
We then cut plywood pieces to make solid walls on the outsides and to wall off the kitchen storage cabinet. Each plywood piece fits into the gaps in the 1×3 frames, and is attached using pocket holes.
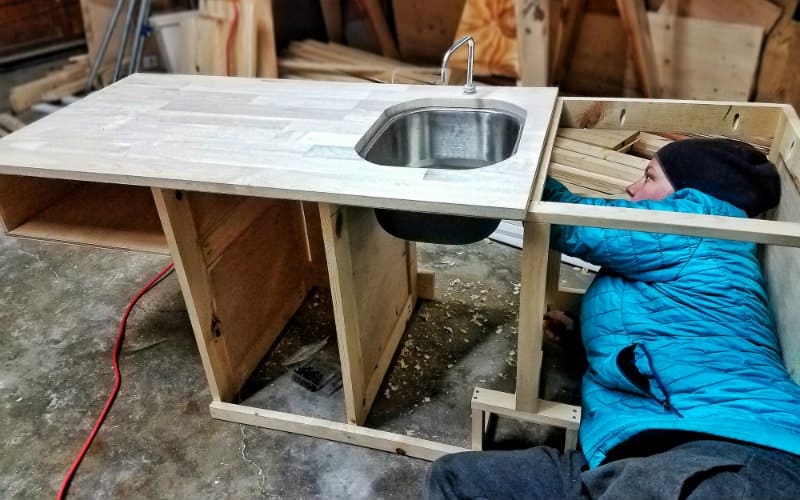
The frame also has another important feature: a 6” x 6” x 6” inset for the foot pump made out of 1×2’s and pocket holes. This allows the pump to be flush with the front of the cabinet, but still be easily accessible for pumping water.
Countertop and Water Access lid
We built the frame so that the sink would rest right on top of it. To make sure the countertop would sit flat, we traced where the sink sits and chiseled this out so that the sink lip would be flush with the top of the frame.

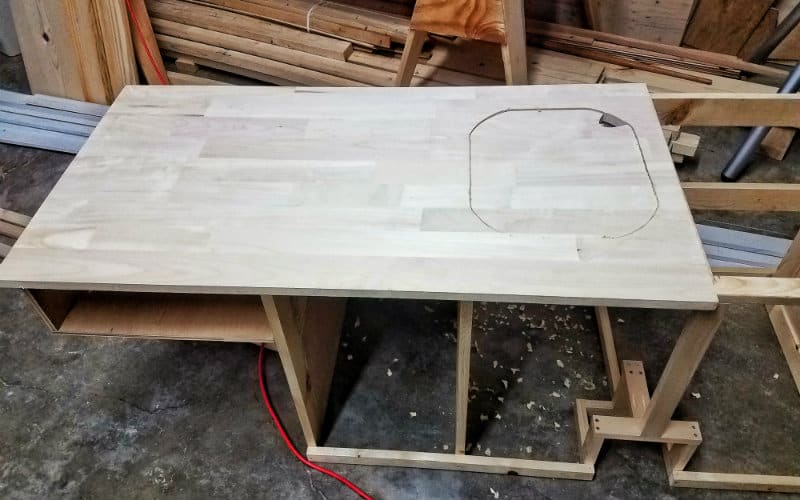
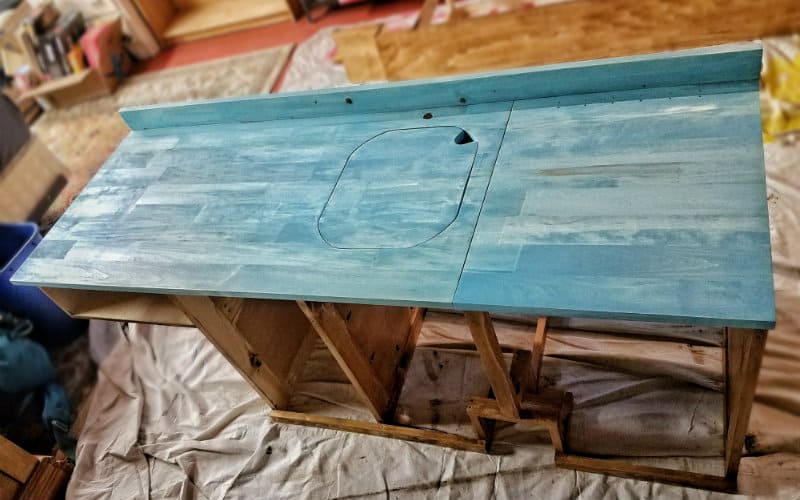
The counter then could go right on top. We used a nice piece of edge-glued board for the countertop. The edge-glued piece we used was 24” wide, so the first thing we did was rip cut it to 20”. Then we cut it into two pieces – one for a fixed counter area, the second for a flip up access lid above the water tank.

To make the access lid, we rip cut a 2” strip off the edge-glued lid piece that we permanently fixed to the top of the frame. We then attached the lid to this piece using a 12” piano hinge.
Making the Sink Cutout
To make the cutout for the sink, we first placed the countertop on the frame and traced as much of the outline of the sink as we could from underneath. We then flipped the counter over, lined up the sink with the pencil lines, and finished tracing.
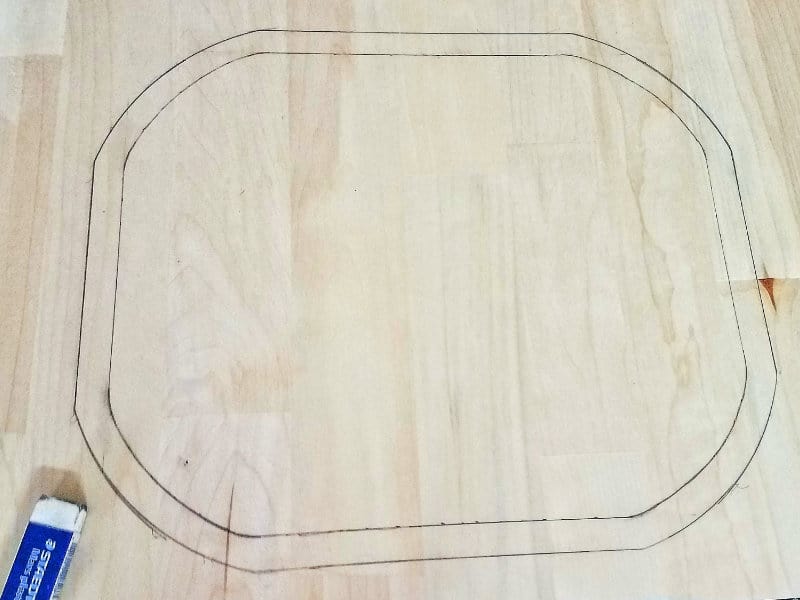
The actual hole needed to be smaller to cover up the lip around the sink, so we drew another line ¾” in from the traced line. We made it so the sink would have about ½” of lip exposed all around.
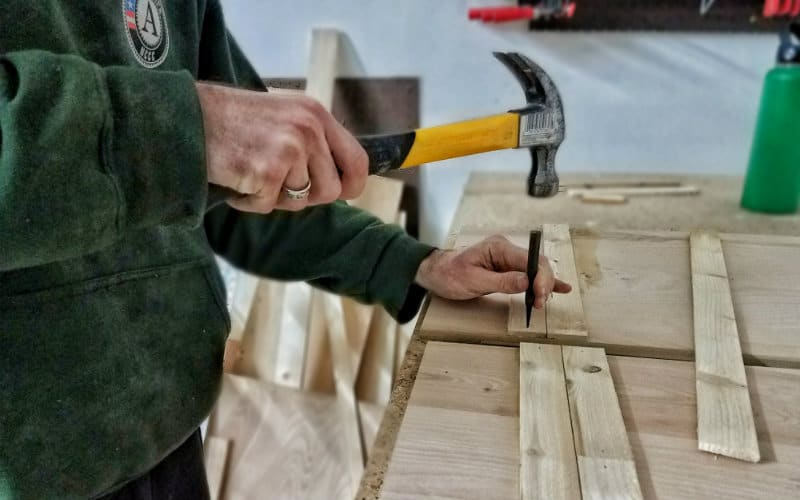
To cut out the hole for the sink, we drilled a hole in the corner with a 1-¼” spade bit, then cut with a jigsaw.
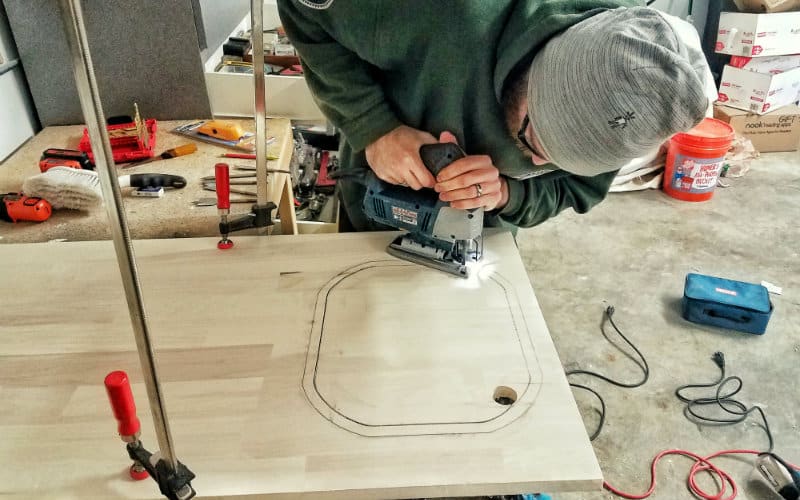
The cutout can rest on the exposed lip, and act as a sink cover to give us more counter space when we need it. The hole we drilled with the spade bit lets us easily grab the cover to remove it. We saw sink covers like this when we were scoping out RVs for inspiration and thought it was a great idea.
Note: When you’re figuring out the design for your van build, we highly recommend visiting RV dealerships and checking out some of the layouts and other innovations. It can be a goldmine for ideas.
After cutting the hole for the sink, we screwed the countertop to the frame using a combination of pocket holes along the top of the 1×3 frame and screws driven up through the 1×2’s along the front. We also drilled a hole behind the sink for the faucet.
Test Fitting and Adding a Backsplash
As with most things in a DIY van build, it’s important to dry fit the cabinets as you go to make sure everything works how you want it to.
When we dry fit our cabinets, we discovered that we had mis-measured the positioning of the gas tank fill tube, so we had to cut out a piece of the frame to make it work. Oops!
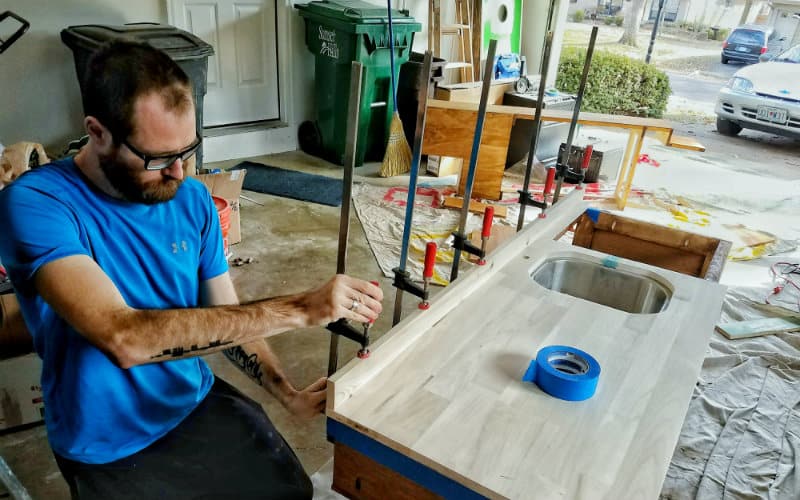
To prevent any drippage behind the cabinets and to enhance the look, we added a backsplash made from a really nice-looking 1×3 piece. We cut it to length, then attached it flush to the back of the countertop with pocket holes and Titebond II wood glue.
Awesome Rustic Mismatched Cabinet Doors
Our cabinet doors are made out of ½” birch plywood, which is very sturdy and also looks great. We cut the plywood to the size of the cabinet openings, leaving some overlap on either side for the doors to rest on the frame when closed.
After cutting the cabinet doors, we installed the hardware (hinges and catches) and test fit them on the cabinet frame. We took the hardware off for the next step.
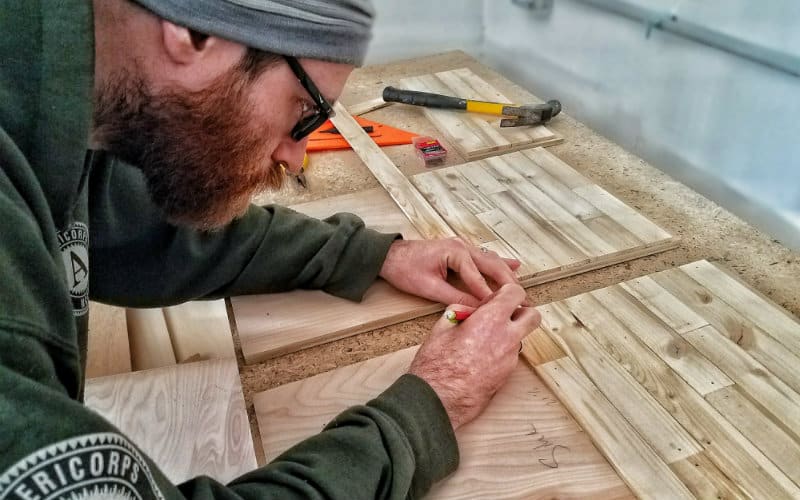
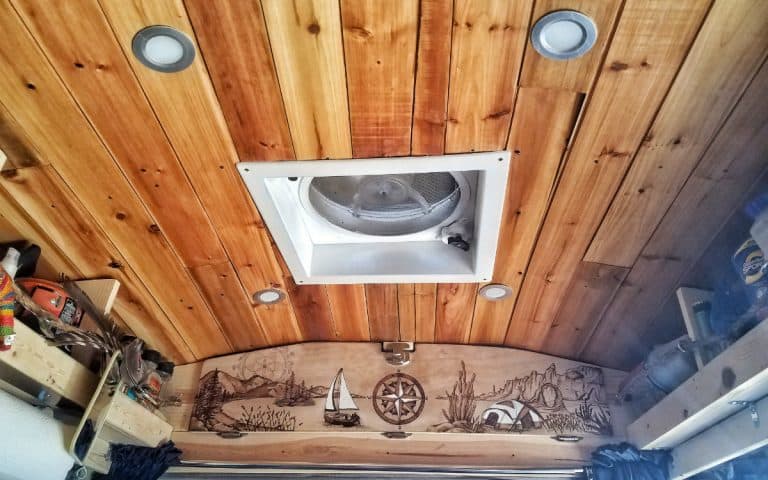
While the birch plywood looks good on its own, we wanted to make our cabinet doors look awesome and unique. So we added a rustic facing of mismatched boards to match the style of our cedar plank ceiling. We found a bundle of ¼” pine lath material for about $11 at Menard’s that was perfect.
First we laid all the doors side by side in proper order on a workbench. Then we cut and attached the lath one row at a time. We spread Titebond II wood glue on the back of a lath piece, then nailed it down using ⅝” wire brads at either end. We knocked the nails further into the holes using a nail punch.
To achieve a mismatched look, we cut the pieces to random lengths – a short board followed by a long board, followed by a medium board, then another short board, etc. We started pieces on one door that we finished on the next door so the grain would be continuous.
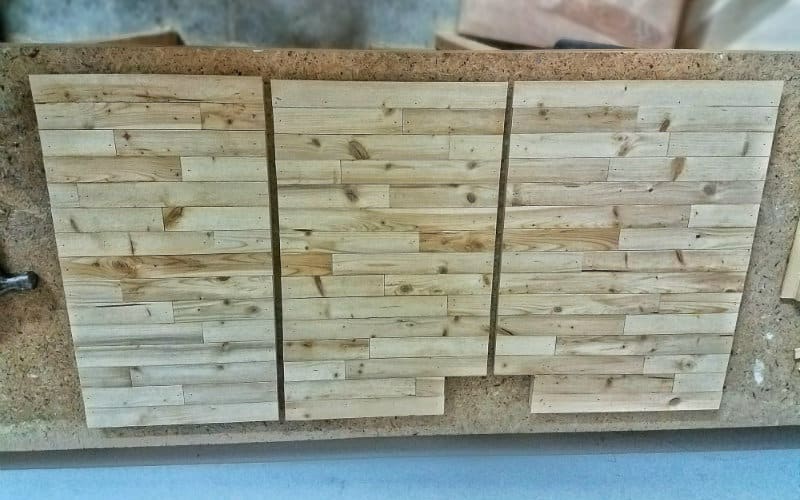
The final row extended above the top of the cabinet doors, so after installing it we sheared off the excess with a jigsaw. We also had to cut some excess lath away from the opening for the foot pump.
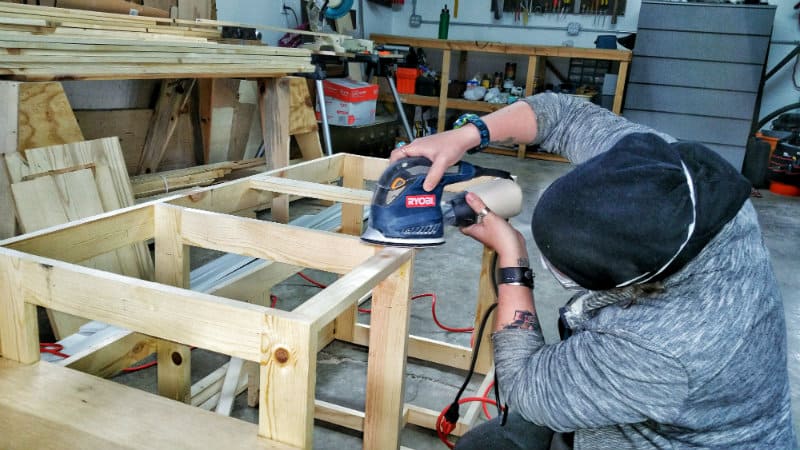
Finally, we sanded everything down. The lath we used had a pretty rough surface, so we started with 50-grit sandpaper, then moved to 80-grit, then 120-grit. This was very time-consuming, but the results were worth it.
Staining the Cabinet Doors and Countertop
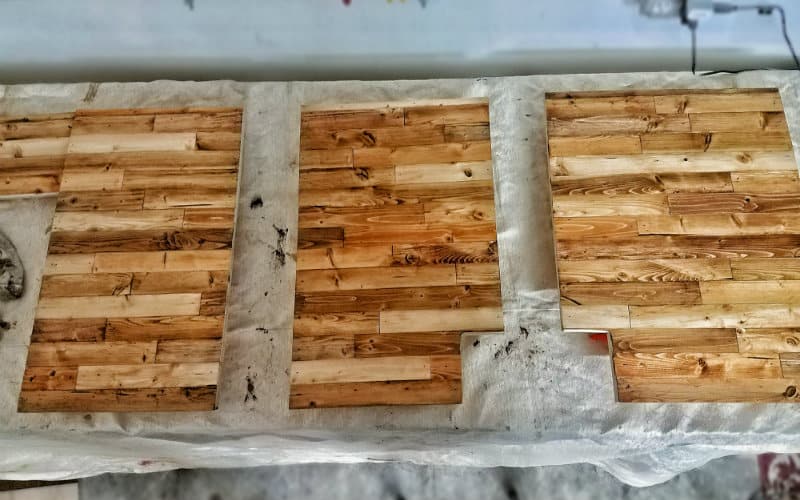
We wanted the cabinet door facing to have the same rustic look as the rest of our van, so we used the same variety of Varathane and General Finishes gel stains that we used to stain our ceiling.

Just like with the ceiling, we went board-by-board, wiping on the stain with a rag and trying to randomly mix up the colors. We then used a small paintbrush to fill in the cracks between the boards.
Here’s a video of John in action staining the cabinet door facing.
The frame was much simpler. We stained the entire thing with Varathane Provincial. We also stained the sides and backs of the doors with Provincial. We finished the doors and frame with two coats of Minwax Wipe-On Polyurethane.
Before staining the frame, we sanded it progressively to 120-grit. We also sanded the countertop down to 180-grit.
For the countertop, we wanted it to contrast with the brown tones of the rest of the cabinet but we couldn’t decide on a stain. We tested a light natural stain on a scrap piece, but it didn’t really “grab” us. Then we decided to stain it a color – either a blue or a green – to go with the rainbow theme we were planning for the rest of the van.
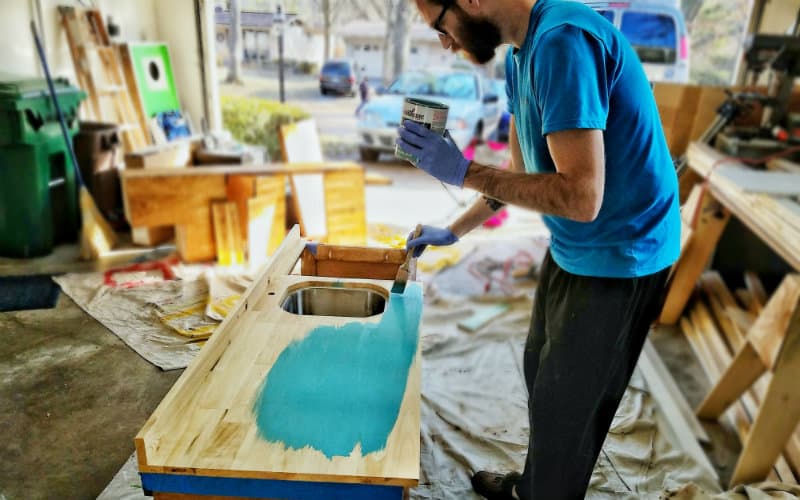
We found an awesome blue stain at Home Depot (Varathane Vintage Aqua) that was perfect – a bright blue that also had kind of a washed look and would let the grain of the wood show through. We brushed on two coats, and it came out perfect.
For a finish, we wiped on three coats of Watco Butcher Block Oil. This seals the wood, adds a nice sheen, and is entirely food-safe.
After all the staining and finishing was complete, we installed the 12” piano hinge on the water access lid and added all the cabinet door hardware.
The cabinet doors got catches, hinges, and pulls, and we also installed sliding window sash locks on the bottom of the main doors and a barrel bolt on the door to the stove alcove to make sure everything stays securely closed while driving.
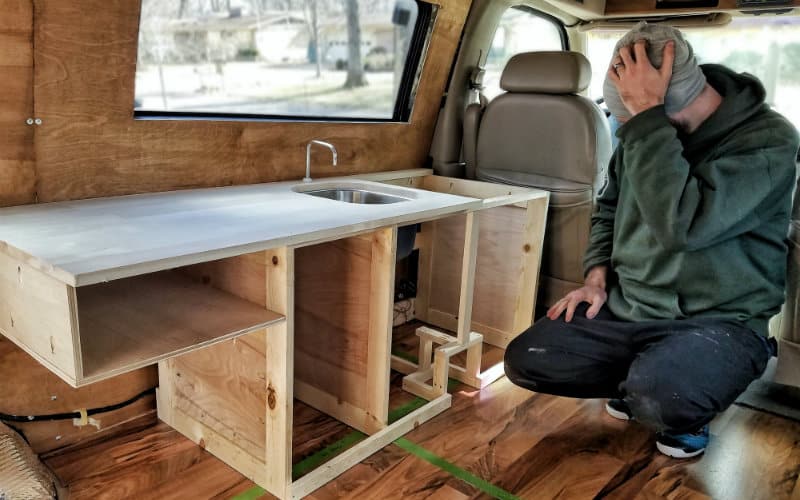
Installing the Cabinets in the Van
Now that our cabinets were built, we could move on to the final – and most exciting – step: putting them in the van!
The way we designed our layout the kitchen cabinet is attached to our fliptop storage bench, so we installed them both at once. To do this, we moved them into position then anchored them to the van floor using a whole bunch of 1-½” angle brackets and ¾” self-tapping screws.
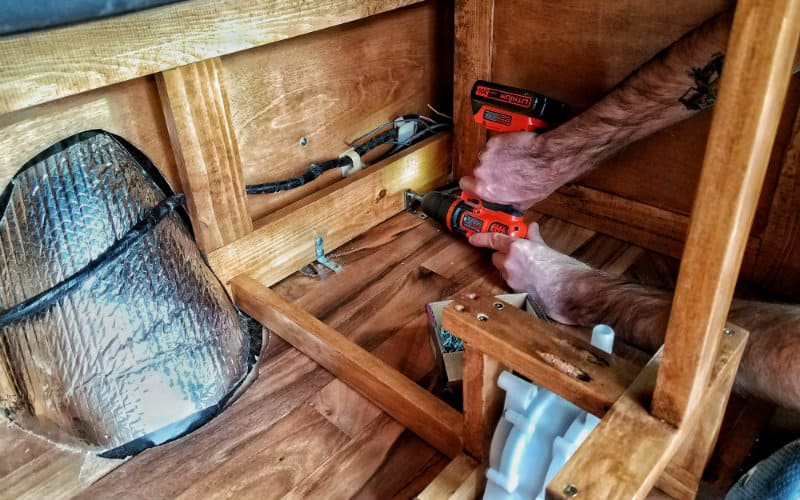
We also screwed the bench and cabinet together where they meet below the stove alcove. These things aren’t going anywhere!
Our van now has an incredibly unique and functional kitchenette. Not only does it hold all of our kitchen stuff and provide a surface to cook and work on – it also serves as a structural support for our bed frame. The rustic mismatched facing is one of our van’s defining features, and the blue countertop adds a great pop of color to our brown van interior.

There’s a lot to love about our custom van kitchen, and we’ve already cooked many great meals with this setup. We hope our ideas have inspired you to customize your own van kitchen.
For more build guides, travel updates and vanlife tips, be sure to follow us on Instagram @gnomad_home and on Facebook. Cheers!
Van looks great! And loving the TL hoodie!
Thanks Lindsey! That hoodie will probably always be my work hoodie, haha. Were you in NCCC?
Thanks for sharing, this help me a lot.
Awesome stuff guys. We are doing a similar kitchen countertop and bed set up. Just wondering it looks like the side of the counter closest to the bed has no supports on it, is that correct? Also if it is how does it hold the weight when the bed in extended out?
Hi Bobby, there is a gap under that side of the counter so that we can slide our cushion (which is part of the bed frame) underneath it when in couch mode. As far as holding the weight, the bed slides out almost to the sink, so there is plenty of support. Hope that helps!
Heya, you guys have been an invaluable resource for us building our van! How high did you decide to make your kitchen countertop? How have you found that height working out for you? Do you cook much standing up? We’re deciding how heigh to make ours currently 🙂
Hi Veronica, our countertop is 24 inches high. We chose this height because of our bed design (the counter is also a support for the bed frame), but the height works out perfectly for cooking while sitting down. If you’re planning on cooking standing up, I would definitely go taller (our van is too low for standing). Hope that helps!
What screws did you use to attach the 1×3’s that run along the back of the cabinet? Did you use pocket holes for pretty much everything else?
Hi Chuck, I used GRK 1-1/4″ trim head screws to attach the 1×3. Everything else on the cabinet was pocket holed. Hope that helps!
~John
What kind of van is it? Looks like a low/standard top van, but what make/model? Great ideas for making the frame and assembly, Also I have been unable to find an alcohol stove anywhere. Where did you get yours?
thanks
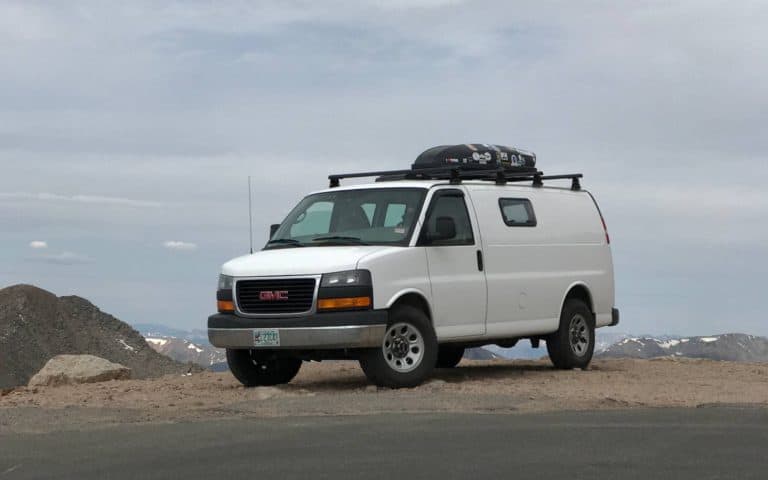
Hi Barbara, thanks for commenting! Our van is a 1996 Chevy Express 1500 high top conversion van. You can get all the details on our van here: https://gnomadhome.com/our-rig/
We got our stove on Amazon UK for less than half of what these stoves were going for in the US. However, this stove has since been discontinued and I’m not aware of any similar stoves on the market. We’re pretty bummed about this because it’s an awesome stove. Hopefully an alternative arises at some point!
~John
Hi!! Thank y’all SO much for posting about your kitchen set up and plumbing. It’s so easy to feel lost when tackling a project like this. I’m renovating a 1973 tow behind Shasta and just getting to the kitchen countertops now. Such a good idea with the cut out, so you can cover up the sink when not in use!! Great job with everything!
Hi Alyssa, so glad this was helpful! Best of luck with your journey!
~John
thanks
You’re welcome! =D
I might have missed it, but I wondering what the overall height, length and width dimensions were for your cabinet. Thanks!
Hi Madeline, we didn’t list the exact measurements in the article. The dimensions of our cabinet is so dependent on the overall build – we decided the height and length based on fitting around our bed frame/bench design, and the width based on accommodating our water tank underneath the cabinet. Since all of this was so dependent on other factors in our van, we figured that our measurements wouldn’t necessarily be transferable to another build and would need to be modified anyway, so we didn’t include them (though perhaps we will update the post with the exact numbers). We’re actually… Read more »
Thanks for the reply John! Totally makes sense that exact dimensions depend on the van/setup etc. I was having a hard time deciding on a good working height for my conversion van counters. Most of what I had been finding was for sprinters which just isn’t the same. I ended up doing something very similar! I went with 24” for my kitchen drawers/counter and bought a pre-fab bathroom vanity that I cut down to 26” for the sink. Worked out well for a quick setup 🙂 Enjoy your travels!
Greetings,
Love the stainless steel water container. How do you fill it?
Thanks
Babz
Hi Babz, we have a 6-gallon water jug that we fill up at a spigot and pour it into the top of the stainless steel tank. We could also run a hose to it, but we haven’t gotten around to buying a drinking water hose.
~John
Hi guys! I was wondering did you use and sort of caulk or sealant between the counter top and the sink? Thanks!
Sierra, did you ever receive a reply to this question? I am wondering the same thing…
Wow, I can’t believe we missed this comment. D’oh! To answer your questions, we use kitchen/bath silicone between the counter and the sink. The process would be similar to installing an undermount sink in any kitchen countertop. Hope that helps!
I just completed my own buildout using so much of your information and advice here: THANK YOU. A few things I’d like to add (I hope you don’t mind): – Get self-tapping screws and screw the Whale to the sheet metal frame. The pump takes quite a bit torque to move the water. Only screwing it to your plywood under flooring runs the risk of ripping up a huge section of floor. – Self-closing hinges eliminate the need for catches. Catches might still be a good idea if you have a lot of loose stuff that could force the door… Read more »
Hi Chad, We’re pumped for you, that’s very exciting! And thanks for all the input! We should edit this post to be a bit more clear about how we screwed down our pump – it’s also screwed into a part of the cabinet that is directly behind it (there are screw holes on the pump for screwing into the floor and for screwing into a vertical wall behind the pump). That secures it pretty well, but screwing it to the frame is also a good solution. That’s great info about hooking up a Whale pump to a standard faucet. Thanks… Read more »
Howdy, first off I want to say how awesome your website is. This is by far the most clear, easy to read, comprehensive and useful “guide” to van customization I have found. Thank you for all the work this must have taken! I am about to begin converting my new house, a 2014 Promaster, of course I have many questions, but one I keep coming back to is how should I plan on securing my cabinets (as well as bed & bench, counters, over-head counters, closet etc.) to the van. Did you drill through those components into your wall and… Read more »
Hi John, thanks so much for the kind words! We put a lot of work into this site, and I’m glad you find it helpful! We secured all of the furniture in our van into the floor/subfloor (but not into the metal underneath) using a ton of metal L brackets and 3/4″ self-tapping screws. The bed frame is also screwed into the wall paneling with heavy duty brackets. Behind the kitchen cabinet, there is a random piece of metal piping welded to the van frame, and we zip-tied the kitchen cabinet frame to this for some extra hold. We also… Read more »