How do you live in a van and make it comfortable at the same time? Especially if you’re traveling with another person, it’s vital to maximize every inch and make sure there’s plenty of available space for stretching out. Even more so if you have dogs (or cats) in the van with you.
In our camper van conversion we have two humans and two dogs all sleeping together, so having plenty of bed space was a top priority. But we also didn’t want our bed to take up too much of the living area. How did we solve this dilemma? With a pullout bed frame that tucks away into a couch during the day and transforms into a queen-sized bed at night!
We first got the idea for an expanding bed frame from Van Dog Traveller’s bench that pulls out into a bed. We also relied heavily on IntotheMystery13’s configuration of a bed platform in the back with a pullout frame supported by the kitchen unit. We created our own version that’s incredibly sturdy and also leaves tons of room for storage under the bed and bench seat. Read on to see how we did it and how you can build your own.
Read More: What’s the Best Bed Design for Your Van Conversion?
Designing Our Bed Frame
The general concept of a pullout bed frame is simple. Half of the bed is a fixed platform, and the other half pulls out like a drawer when you convert it to bed mode. The mattress is supported by slats. Half the slats are fixed to the platform, while the other half pull out with the expandable part.
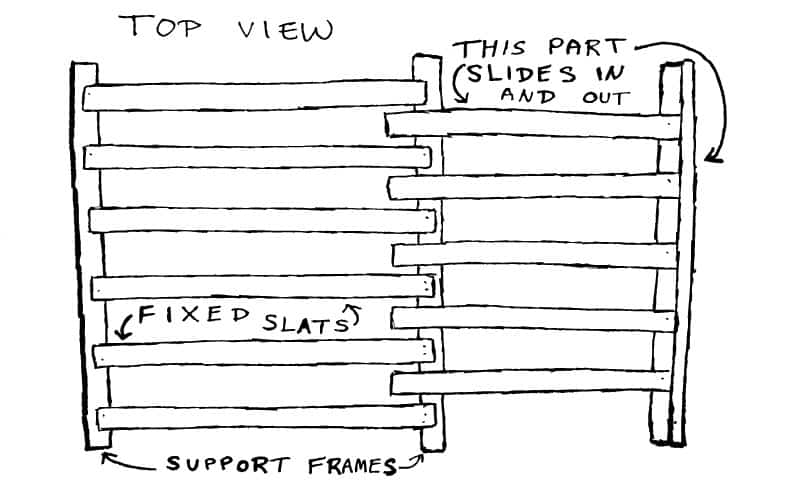
There are a few things to think about when designing this type of bed frame. We’ve seen these questions answered in many different ways, and how you answer them will depend on your van and the kind of setup you’re going for.
How do you make sure the pullout part is strong, stable, and doesn’t tilt up or down?
If you just have free-floating slats attached to a front piece, then you’ll have problems with the pullout part tilting up or down and twisting side to side. It will also be very structurally weak, and I probably wouldn’t trust it to hold much weight.
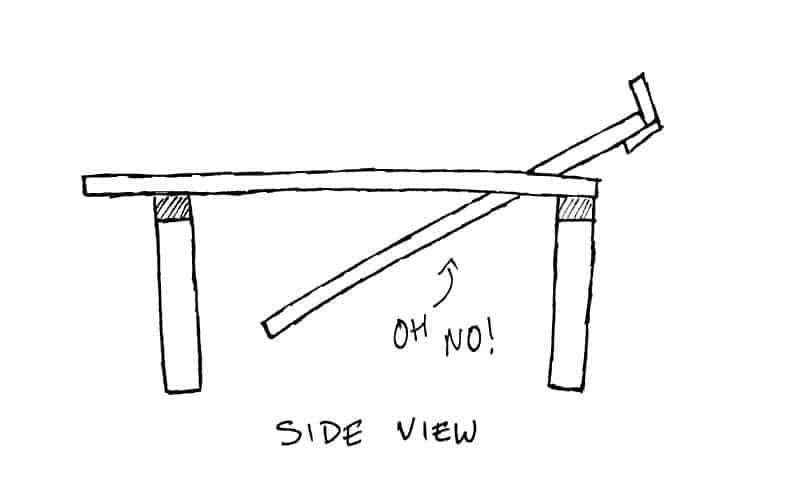
To solve this, we added a crossbar underneath to connect the pullout slats, and side rails to guide and support the frame as it slides in and out.
How do you support the bedframe when it’s pulled out?
The pullout part needs something to rest on if it’s going to hold up a mattress (and you). IntotheMystery13 solved this by having the bed pull out over his kitchen unit on one side, and building a small bench that supports the bed on the other side.
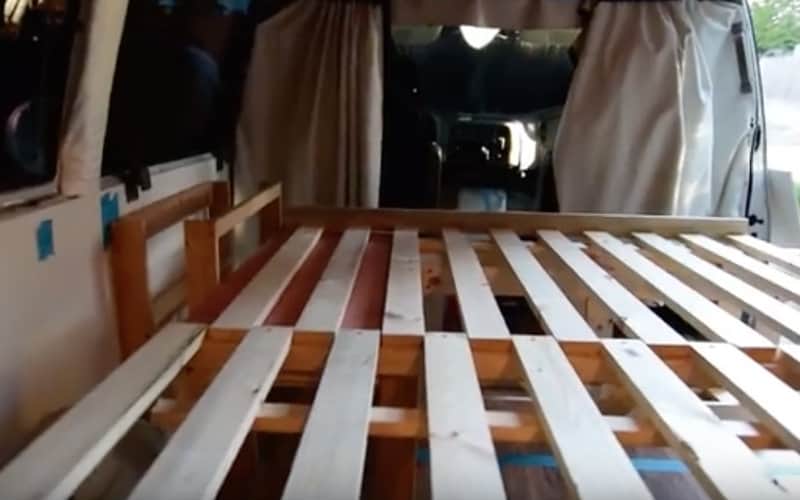
Van Dog Traveller took a different route and included legs that pull out with the bed frame.
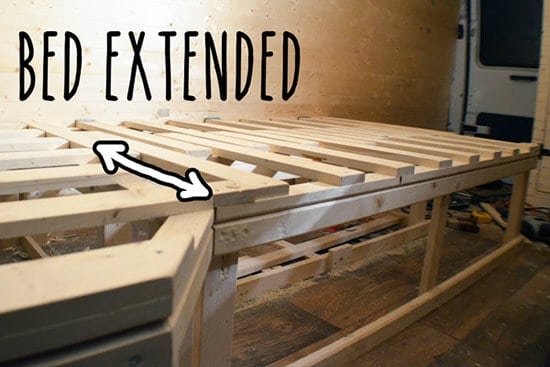
We ended up creating our own variation of IntotheMystery13’s configuration. The bed rests on the kitchen unit on one side, and we built a support shelf on the other side that we screwed directly into the van’s metal frame. It’s simple and it works great.
How do you make the bed functional when it’s not in bed mode (i.e. pushed in)?
When you’re living in a van, every bit of space counts, so it’s important to think about what purpose your bed will serve when it’s not in bed mode. IntotheMystery13 uses his as a seat. Van Dog Traveller’s bed becomes a nice bench seat that also flips open to access a storage area.
Our bed acts as the backrest for a bench seat that’s revealed when we push the bed in. The platform itself is a great resting place for our dogs, and we built it high enough to provide a very large storage area underneath where we stash our instruments, camping gear and tools. The bench seat also has storage underneath, and we can even access the rear storage from the living area.
What happens to the mattress?
Where does the mattress go when you push in the bed? IntotheMystery13 has this folding mattress, and it simply folds back onto the main platform when he pushes in the bed. Van Dog Traveller’s mattress also serves as the cushions for his bench seat. We’ve seen other designs where the mattress folds up into a futon-style couch.
We went with a modular design where pieces of the mattress become the cushions for our bench seat. We cut our mattress into three pieces – one large piece for the stationary platform, and two smaller pieces that we remove from the frame and place over the bench seat when it’s in couch mode.
Building Our Bed Frame
Customizing This Design for Your Van
With any van build design, it’s tough to give measurements that will work for everyone. Every van is different and every build out is unique. We found ourselves borrowing a lot of concepts from other vanlifers and modifying, improving and customizing them to our needs. Our van might be a little shorter than yours or our kitchen unit might be a different size – both of which affect the actual measurements. Please borrow freely from our bed design, but make sure to change it to fit your van!
What We Used to Build Our Bed Frame
Support Frames
- 2×3 Studs
- 2-½” Pocket Hole Screws
- 1-½” Angle Brackets
- Heavy Duty Angle Brackets
- ¾” Self-tapping Screws
- 1×3 Board
- 1×2 Board
Pullout Frame
- 1×4 Board
- 1×3 Board
- 1×4 Furring Strips
- 1×2 Furring Strips
- 1×1 Strips
- 1-¼” Pocket Hole Screws
- 1-¼” GRK Trim Head Screws
- Heavy Duty Felt Furniture Pads
Side Rails
- 1×2 Boards
- ½” Birch Plywood
- 1-¼” GRK Trim Head Screws
- Titebond II Wood Glue
Slats
- 1×3 Furring Strips
- 1×2 Furring Strip
Support Shelf
- 1×3 Boards
- 1×4 Board
- 1-⅝” Self-Tapping Screws
- 1-¼” GRK Trim Head Screws
- Heavy Duty Angle Brackets
General
Mattress
- Modway 6″ Memory Foam Mattress
- Electric Carving Knife OR Serrated Bread Knife
- Colorful Fabric
- Heatbond
- Iron
- Sewing Kit
Step 1: Build and Install the Support Frames
We used 2×3 lumber for our main supports. Many vanlifers use 2×4’s in their bed construction, but 2×3’s are more than strong enough. If you’re really worried about van weight you might be able to get away with using 2×2’s.
Each support frame consists of a crossbar that runs across the width of the van, with two legs holding it up from underneath.
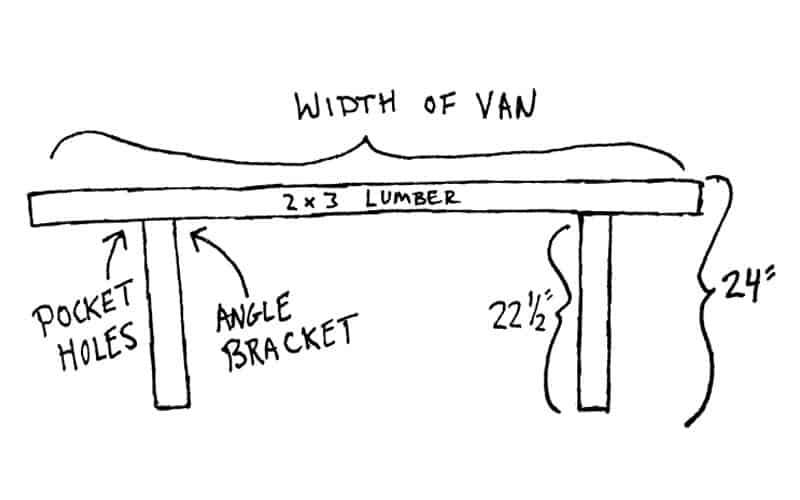
The support frames are 24” tall, which matches the height of our kitchen unit.
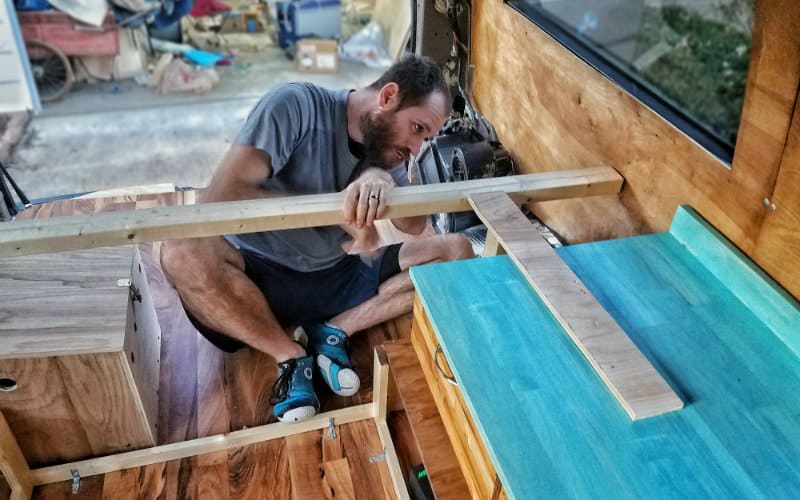
We attached the legs to the support frame using pocket holes on one side and 1-½” angle brackets on the other side.
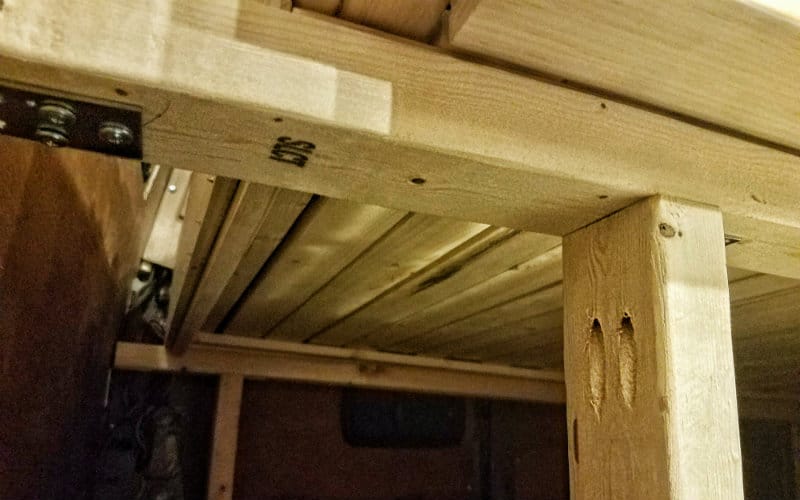
The ends of the cross pieces are attached directly to the plywood walls with heavy duty angle brackets and ¾” self-tapping screws.
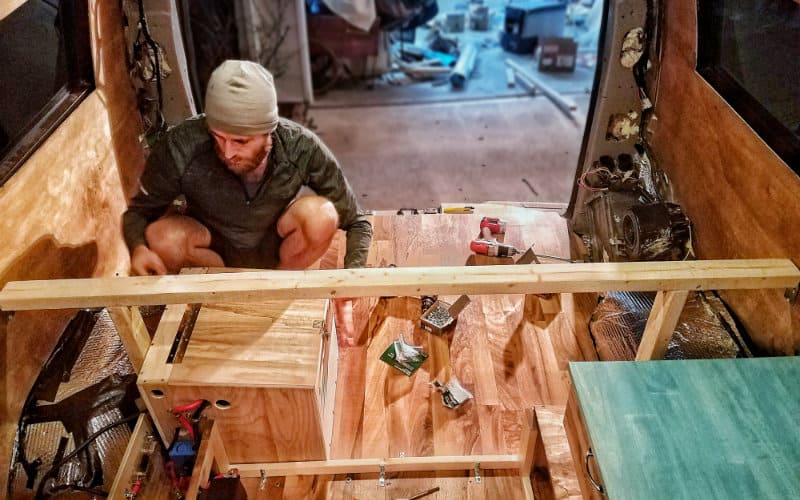
We positioned the rear support frame about 2 inches from the back of the van, and the front frame right up against the storage bench (leaving about an 8-½” gap between the support frame and the edge of our kitchen unit to accommodate the back cushion and bed frame).
We screwed the legs down to the laminate flooring with 1-½” angle brackets and ¾” self-tapping screws.
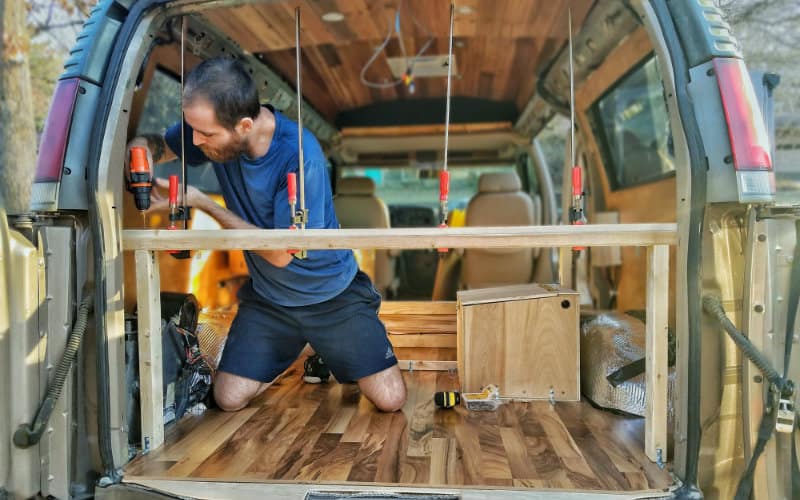
After we installed the main support frames, we screwed a 1×3 board on top of the rear frame and a 1×2 on top of the front frame. These are both cut to 62-½” and centered on the support frame.
These boards provide something to screw the side rails to and bring the height of the support frames up to 24-¾”, which is where we need it for the bed frame to clear our kitchen unit.
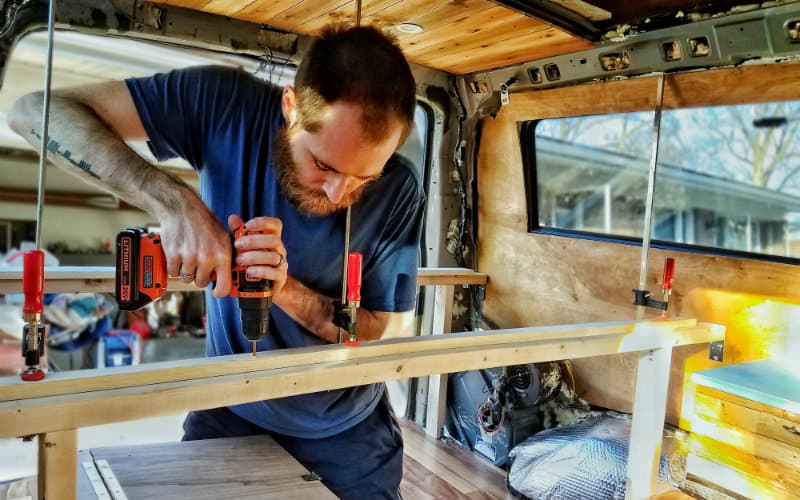
The 1×2” on the front also creates a little shelf for the front of the bed frame to rest on when it’s in couch mode.
Step 2: Build the Pullout Frame
We built the pullout frame using 1×4 pine lumber. The front is a nice-looking 1×4 piece attached to a 1×3 bottom piece to screw the slats to. We cut the 1×3 a few inches short on one side so it could slide over the support shelf.
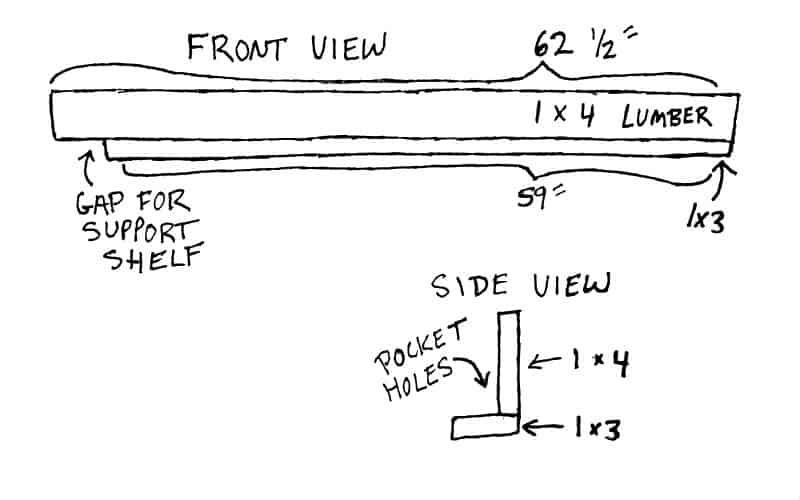
For the sides of the frame, we used 1×4 furring strips, which are slightly thinner than regular 1×4 lumber. This was essential to make sure the frame slid smoothly in and out of the side rails. We also screwed 1×2’s flush with the bottom of the side rails to provide support for the mattress.
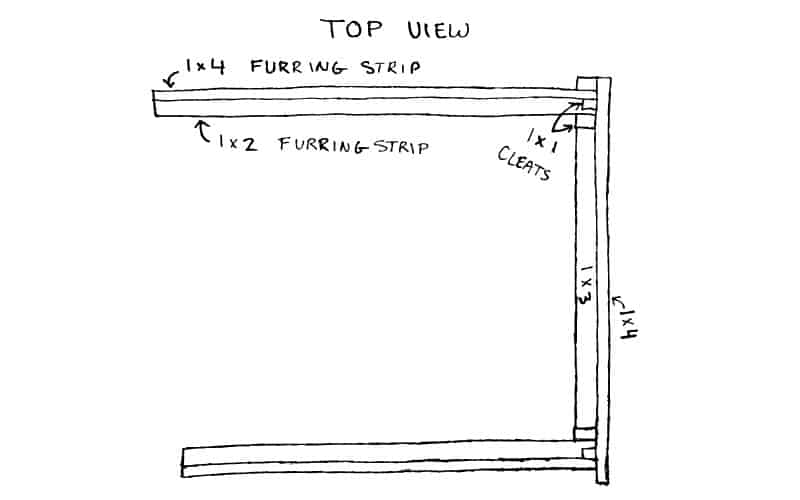
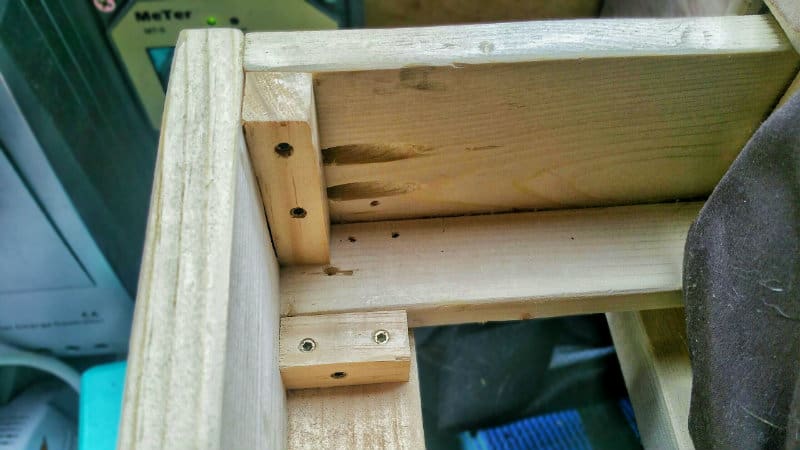
We attached the sides to the front of the frame with pocket holes, screws from the bottom, and cleats made from 1×1 strips for extra stability
Step 3: Build the Side Rails
The side rails add a lot of stability to our bed design and help the frame slide in and out with ease.
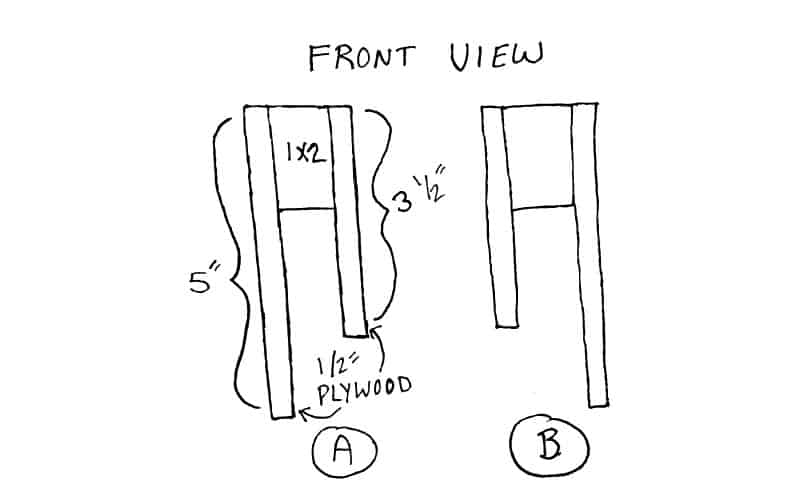
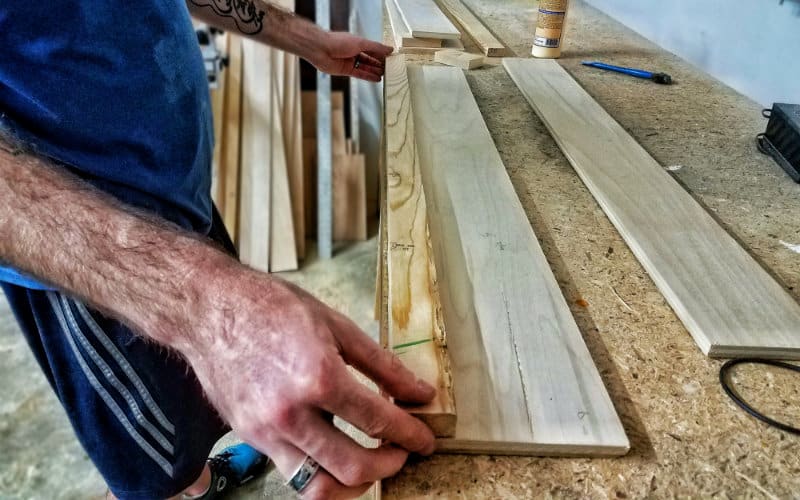
We cut two 1×2’s and four pieces of ½ plywood to the length of the rear platform. For the plywood width, we cut two pieces to 5” and two pieces to 3-½”. We sandwiched them together using wood glue and screws.
We mounted the side rails to the support frame by screwing them into the ends of the 1×3 (in the back) and 1×2 (in the front) boards sitting atop the support frame.
Finally, we added 1×2’s to the bottom of each side rail (flush with the top of the support frames) to guide the bed frame from underneath and prevent it from tilting down.
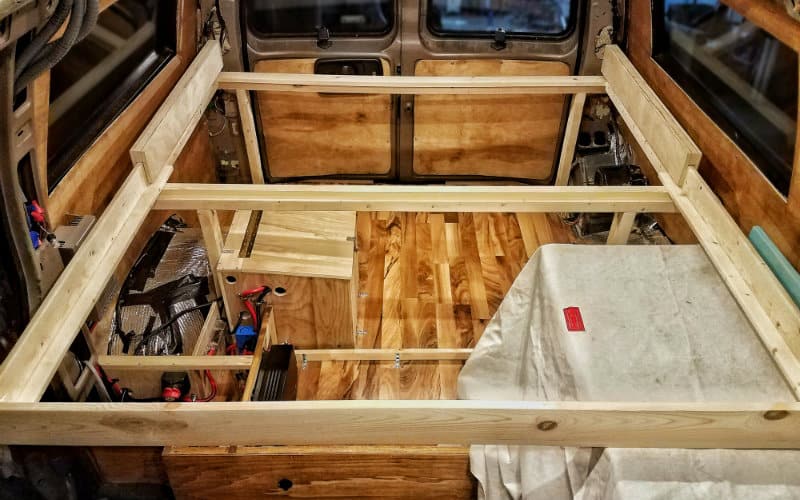
The side rails provide a sturdy channel to guide the bed frame and prevent them from moving up and down or side to side.
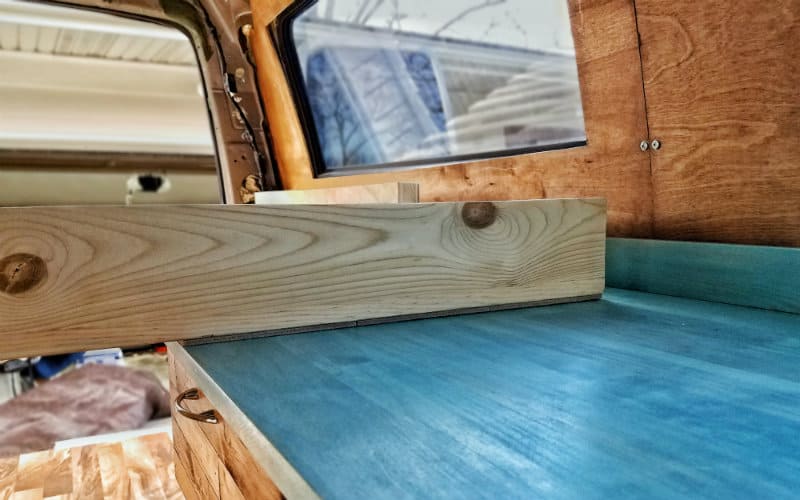
We also stuck felt furniture pads under the frame so it wouldn’t scratch up our beautiful kitchen counter!
Step 4: Cut and Install the Slats
We used 1×3 furring strips (and a 1×2 furring strip) for the bed slats. You want to space your bed slats wide enough that they have room to move, but also close enough that they’ll provide plenty of support for the mattress.
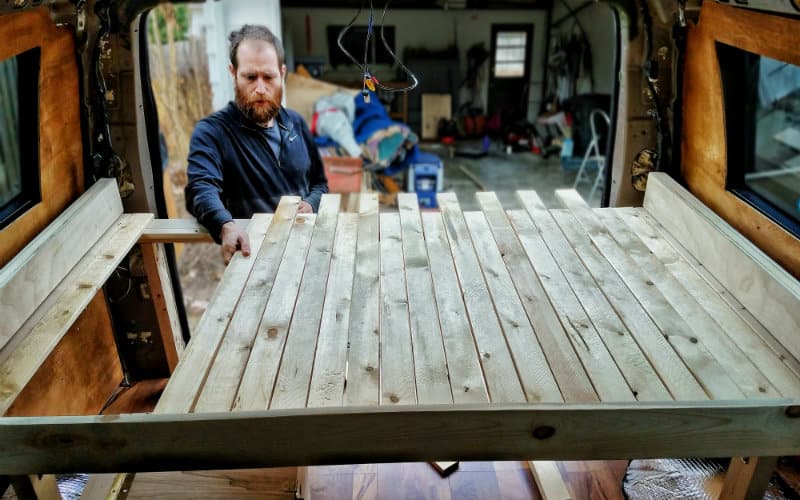
After some trial and error, we settled on having 12 stationary slats screwed to the bed platform (all 1×3’s), and 11 slats that move with the pullout frame (ten 1×3’s and one 1×2).
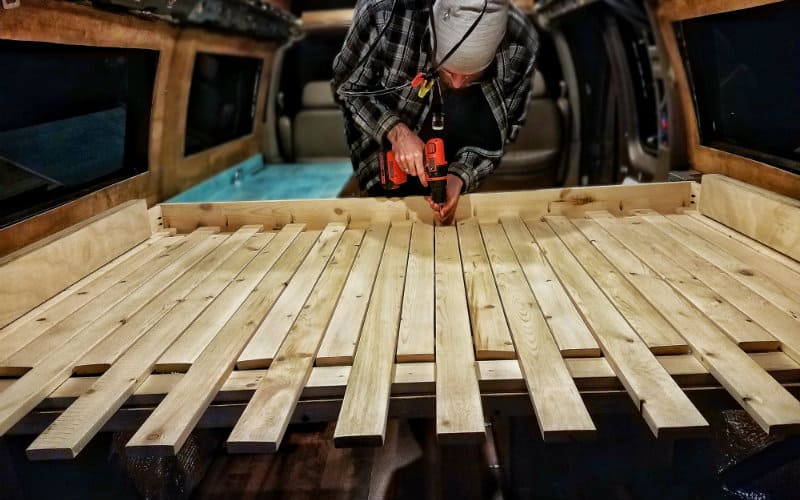
We cut the slats to the proper length (this all depends on your specific van configuration and the length of the bed platform) and screwed them down, alternating between stationary and moveable.
The stationary slats are screwed down to both support frames. The front ends of the moveable slats are screwed to the pullout frame, while the back ends are screwed to a 1×2 crossbar that runs underneath the bed slats. This 1×2 ties the pullout frame together and provides additional stability.
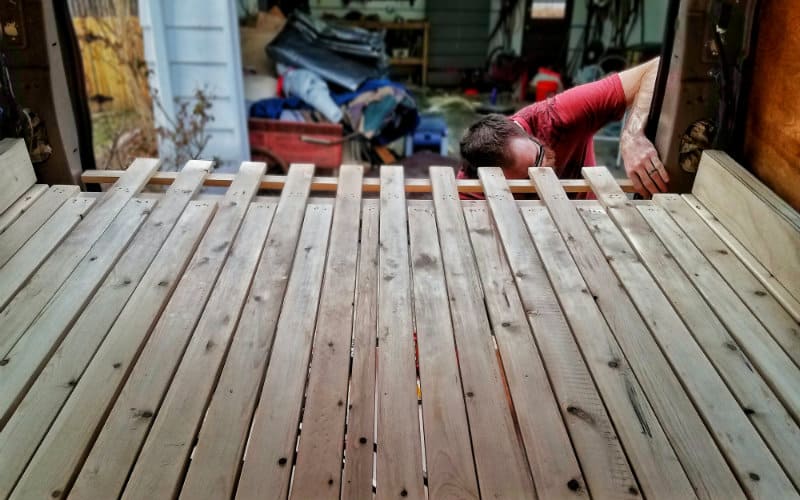
The stationary slats extend into the rear door frame. By building our bed all the way against the rear doors, we were able to get an extra 4 inches of space inside our van.
Step 5: Build the Support Shelf
We needed something to support the bed frame on the passenger side, so we built this support shelf that does the job perfectly.
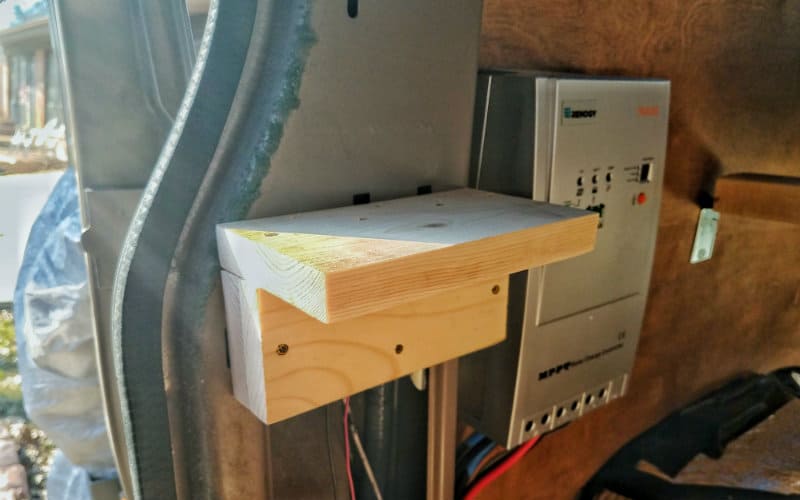
For the supports, we screwed a 1×3 directly to the metal post next to the side door using 1-⅝” self-tapping sheet metal screws (countersunk into the wood so the heads aren’t sticking out), then screwed another 1×3 on top of it.
The shelf is a 1×4 screwed down to the supports, then we added heavy duty angle brackets for extra strength.
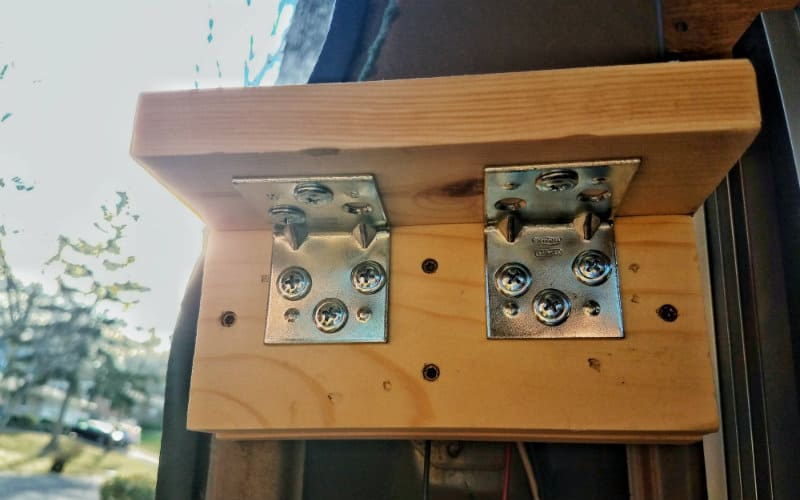
This little shelf holds up our bed frame like it’s nothing, and makes it rock solid when it’s fully extended.
Step 6: Lubricate Moving Parts with Johnson’s Paste Wax
After spending so much time designing and building this pullout bed frame, we were pretty excited to test it out. And it worked, but it was very, very difficult to move. All that wood rubbing together caused a lot of friction and made it a huge challenge to pull out the frame.
Relying on our internet research skills, we found out that many woodworkers that build all-wooden drawers solve this problem by waxing the drawer slides.
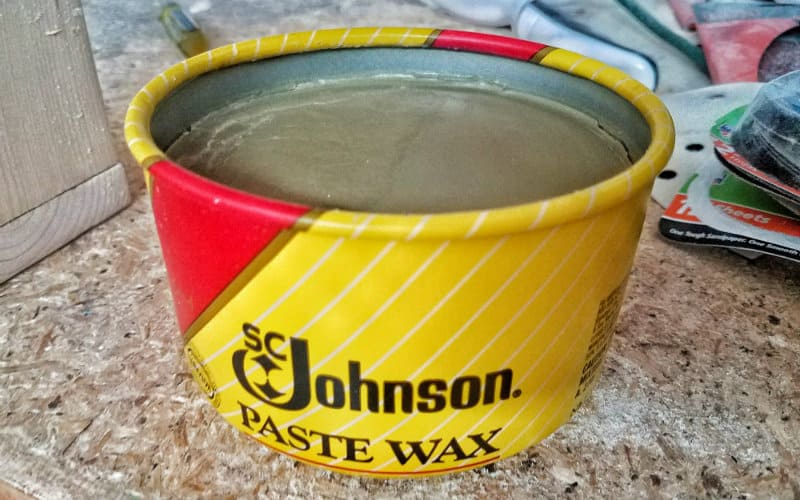
We picked up some Johnson’s Paste Wax (available online or in the cleaning section of Home Depot) and rubbed it on all the moving parts of our bed frame.
And WOW did it make a difference! Our frame now slides in and out easily, and we’re able to convert it from bed mode to couch mode and back again with hardly any effort.
Picking Our Mattress
Our bed frame was built, but we were still missing one crucial component: a comfortable mattress that we could modify for our bed design.
The perfect mattress for our bed setup had to hit a specific set of criteria:
- Not too thick. A really thick mattress would be unwieldy and take too much height away from the bedroom area.
- Not too thin. A really thin mattress might be lighter and easier to deal with, but it would also sacrifice on comfort.
- Not too expensive. No sense dropping hundreds of dollars on something we’re going to cut apart and beat up on the road.
After some research and looking around on Amazon, we decided on this 6” queen-sized memory foam mattress from Modway. It’s gel-infused so it stays cool, it’s very comfortable (it even rivals our nice Tuft & Needle mattress that we had in our previous life), and the foam is CertiPUR-US certified to be free of formaldehyde and other nasty chemical compounds. We found the 6-inch thickness to be the perfect balance of comfort and compactness.
Cutting Our Memory Foam Mattress
We needed to cut our brand new mattress into three pieces for our bed design. We had heard that using an electric carving knife is the best way to cut foam mattresses, but we didn’t have one handy and didn’t want to buy one just for this. Instead, we used a regular serrated bread knife and it worked perfectly.
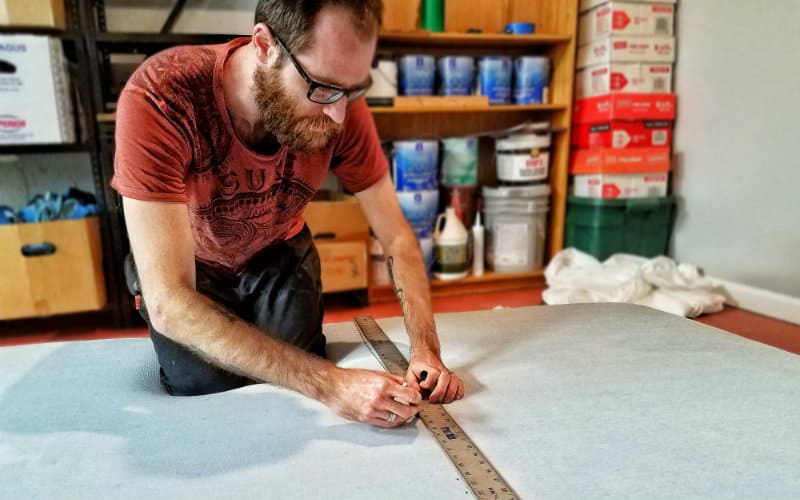
If you want your cut to be straight, make sure to draw the line you need to cut with a Sharpie and a square. Then, start cutting.
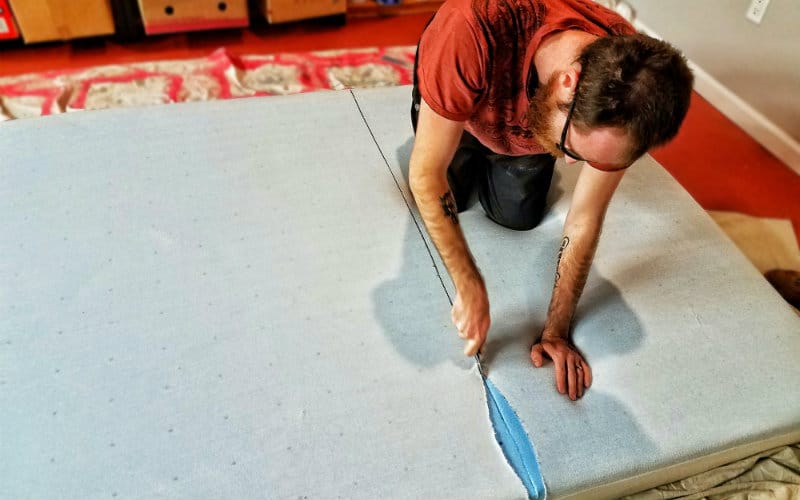
It’s surprisingly easy to cut through memory foam, so just take it slow and follow the line.
Upholstering the Mattress Pieces
We upholstered the seat cushions with some colorful fabric that we picked up at Hobby Lobby. First, we covered the cushions with pieces of the cover the came with our mattress, using Heat Bond to attach the seams.
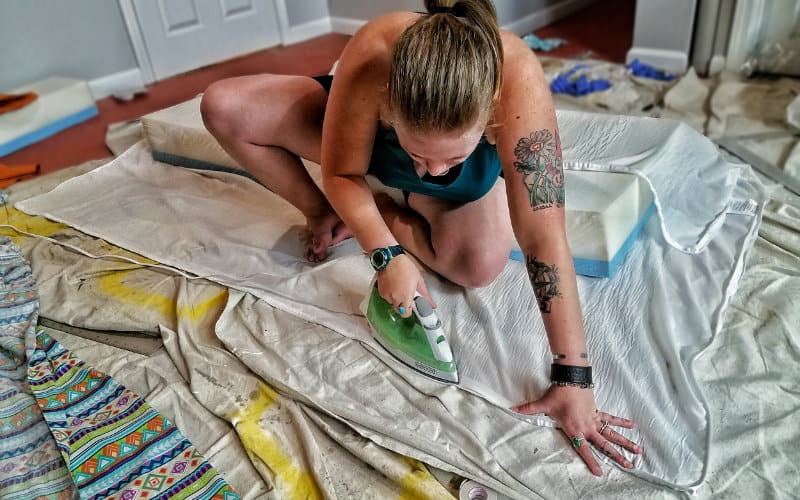
Then, we wrapped the fabric around the cushions like we were wrapping a present. We tried using Heat Bond to attach the seams here also, but the hold just wasn’t strong enough. So, Jayme quickly taught herself how to cross stitch and sewed all the seams together.

Here’s a quick tutorial on cross stitching:
And here’s the cut and upholstered mattress inside the van:
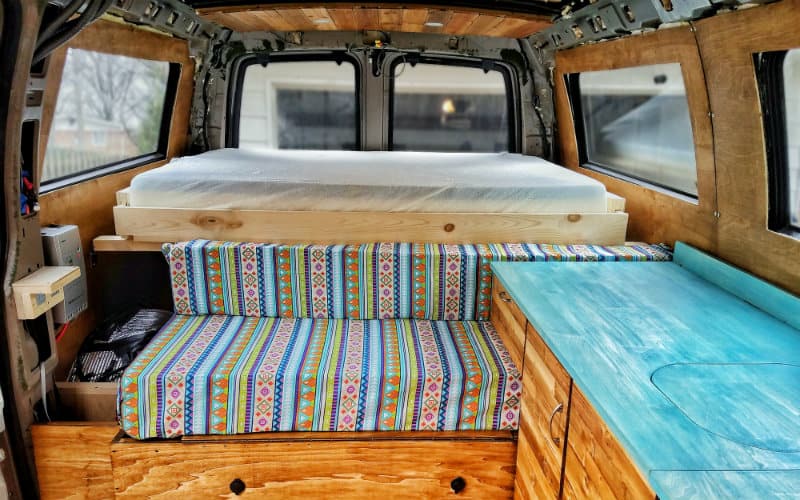
The seat cushion fits underneath the kitchen unit and the backrest fits behind it.
NOTE: After using this setup on the road for awhile, it turned out to be a pain in the ass to pull the seat cushion out from under the kitchen unit every time we want to access the storage under the bench. We decided to cut it into two pieces to make it easier to maneuver.
Our Pullout Bed Frame in Action
Here’s what our bed looks like when it’s in couch mode:
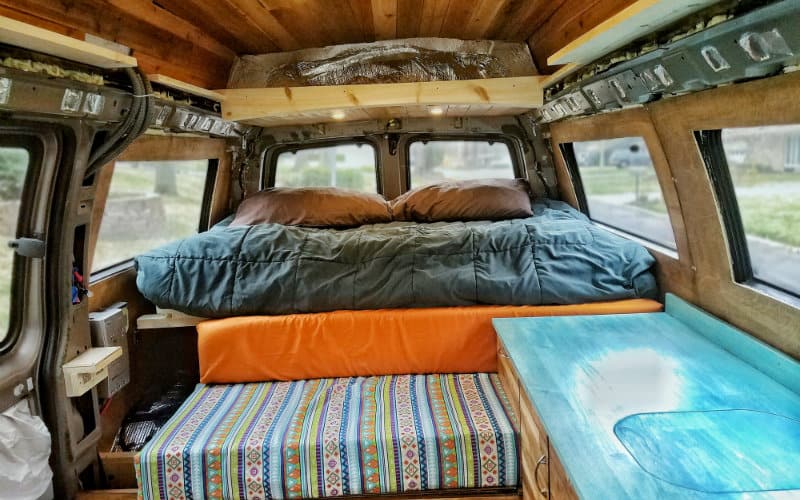
To convert it to bed mode, first we take the couch cushions off, stack them on top of the bed platform, and pull out the bed frame:
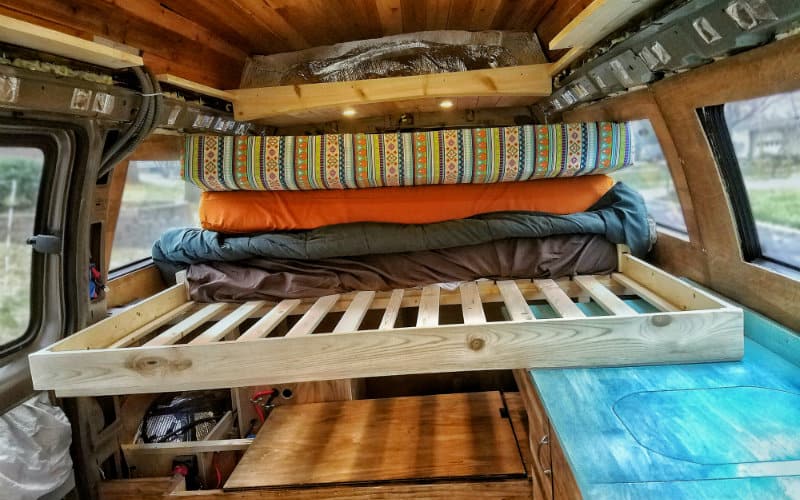
Then, we insert the cushions into the extended bed frame
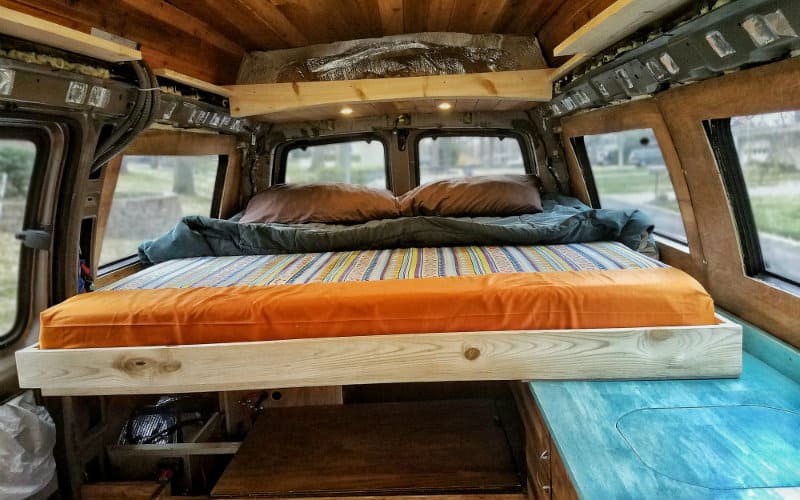
Finally, we pull the mattress cover, sheets and blankets over the cushions.
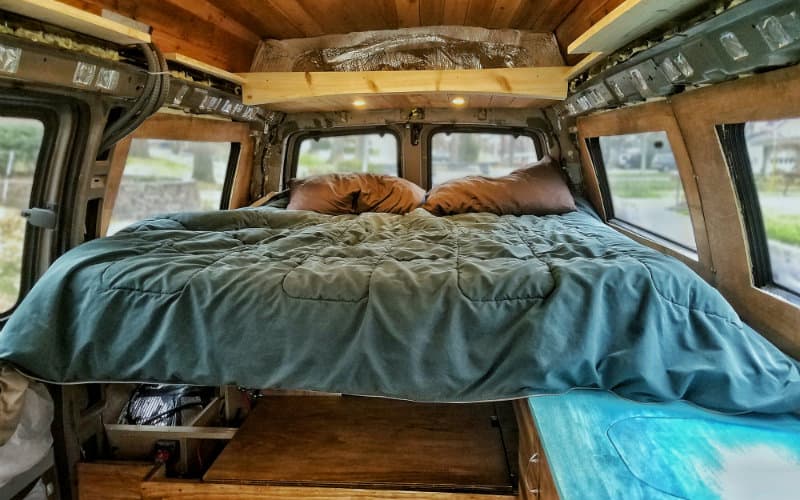
And there you have it! A queen-sized bed in a camper van!
There’s still a lot of space in the van even with the bed fully extended, and all the storage underneath the platform means we can stuff a guitar, banjo, mandolin, ukulele, lots of tools, a gas can, a 6 gallon water bottle, backpacking packs, a tent, extra dog food, shower stuff, spare cooking fuel, and shoes back there and still have plenty of room for more. Not to mention the two huge batteries for our electrical system that we have stashed under there.
This camper van bed design has proven to be very functional and space-efficient. It’s also easy to setup and breakdown, and the mattress is super comfortable too! It’s definitely a great place to cuddle up with the pups after a long day of enjoying the wilderness.





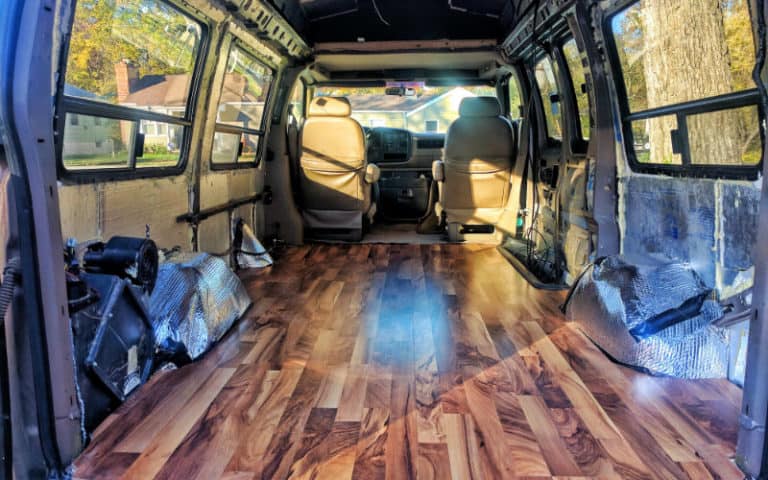

Hey John,
Will here, what changes you would make is you were going with a full size bed?
Hi Will, going with a full sized bed would only affect the width. So the whole bed would be narrower, meaning fewer slats and a different slat arrangement. The basic front to back mechanism would stay pretty much the same. Hope that helps!
Are the sides of the frame supports screwed only in to the 1/4″ plywood walls? Or are there ribs behind the plywood that the screws are going into? It seems like it would not take much movement for the screws to be ripped out if only pulling on the plywood.
Hi Charles, the sides are only screwed into the 1/4″ plywood. However, the bottoms of the frames are screwed down through the flooring into the 3/8″ plywood subfloor, and are also attached to the bench in front of it and the battery box, both of which are also screwed into the floor. The setup is pretty solid and does not move at all, but I agree that attaching to the van body would be better, and I wouldn’t be surprised if things flew around in a crash. While this is how we did this van build, we are working towards… Read more »
DUDE! This is so money. I am mega tall, so i can’t sleep width wise in my promaster. I’m a light sleeper though, and as such am super curious if you ever notice the cracks in the mattress? My only fear in doing a moveable bed is the mattress situation. Anyway, awesome writeup – super clear and easy to follow. High likelihood i’ll be copying you.
Hi Hannes, thanks for reaching out. We actually don’t notice the cracks in the mattress at all. It probably helps that the pieces fit snugly into the frame, and we have a mattress cover and sheet that we pull over it, which makes it feel like a continuous surface. Good luck with the build!
~John
Hi there, I have a question about the mattress. It looks like you left the fabric cover on while you cut it? I’ve been trying to find the right mattress to cut for my van & keep seeing people talk about fiberglass getting everywhere if you cut a memory foam mattress. Did you have any issues with fiberglass? It worries me – especially breathing it in! Thanks!
Hi Lina, great question! We cut through the fabric cover, then sewed it back on around the mattress. We did not have any issues with fiberglass particles or anything like that. However, I have read about this being an issue, especially on cheaper mattresses. It seems that many mattress companies include a fiberglass layer as a fire retardant, which is then wrapped in a fabric cover. Again, we did not have a fiberglass issue with our mattress back in 2016, but I can’t say guarantee they haven’t made any changes since then. This is definitely something we will research further… Read more »
Finally i’ve found something similar to what I want to do, thank you. I’m going to try to do the end bit a little differently (raise instead of slide out) but I’m surprised people haven’t done this more. Makes perfect sense to us, best of both worlds, thank you!
Hi Wendy, thanks for the comment, and best of luck with your build!
~John
Hi guys! Just wanted to pop in and say thanks for all the helpful posts. We found your youtube van tour video years ago and liked the bed design. We are now in the USA building out our own van to travel around the USA and through Mexico / Central & South America. Weve used a lot of your advice in the build and used a lot of your amazon links so hopefully you get a little something from that! Thanks again 🙂 Carl and Renee
Hi Carl and Renee, thanks so much for the kind words, and we’re so glad we were able to help you get started on your adventure! 🙂 Mexico/South America are definitely on our bucket list, I’m sure that will be an awesome journey! Best of luck!
~John
Hi guys! We have utilized your van plan to the max so just want to say a quick thank you!! Here’s another mattress question for ya… we bought indoor/outdoor upholstery fabric for the mattress pieces. Just curious in your info it says you lay down a mattress protector first before your sheets & bedding. Any specific mattress protector? A memory foam mattress can get warm at times and I want to protect it from sweat as best as possible. Thanks again!
Hi Dayna, so glad our site has been helpful! We just used a basic waterproof mattress protector. We safety-pinned the far end of it to the rear of the mattress to keep it in place (along with the fitted sheet). Once we get our bed set up, we just pull the protector and sheet over the rest of the mattress. Hope that helps!
~John
Awesome build! I’ve been using your blog extensively as a reference for my own build.
I’m on a hunt for a mattress, and the one you have seems to fit perfect to my requirements.
I heard some reviews that say not to cut the mattress because it had a fiberglass cover and removing it gets fiberglass all over the place.
Did you have any concerns or issues with it? Any precautions I need to take before/after cutting the mattress?
Thanks!
Hi Nir, thanks for reading! There was sort of fabric cover around the mattress – not sure if that’s the fiberglass cover that’s being referred to. We cut the cover off using scissors, then sewed it back around the large section after we cut the mattress. Other than that, it’s basically a multilayer foam mattress. It was super easy to cut with a serrated bread knife, but it definitely helps to draw out straight lines and make sure you’re cutting straight on the vertical side as well. Hope that helps!
~John
Hi, when pushed back in/assembled for day time/travel, does it rattle at all? Thinking mainly about service/washboard roads here, but also some highways can be a rougher surface as well. Thanks!
Hi Brandon, our bed does not rattle, move, or make any kind of noise while driving. Best of luck on your build!
~John
Love your van build! What is the length of your be when extended and when closed up in bench mode?
Hi Joe, thanks for the kind words! Our bed is 76″ fully extended (just short of a queen-sized bed), and the fixed rear platform is 42″ when the bed is closed up in bench mode. The bench part extend in front of that another 23″. Hope that helps!
~John
Nice build guys. I had a question about your mattress. I’m on the hunt for mine now, and I’ve heard that memory foam can be quite cold in chilly weather. Have you guys been touring around in any kind of winter weather at all yet, and if you have what’s that experience been like?
Hi Ryan, thanks for commenting! We swung through Vermont and upstate NY last December, and we’ve also camped out on desert nights that got down into the 20s. We haven’t noticed anything different about our mattress. I haven’t heard anything about memory foam getting overly cold, but it is heat-activated and stiffens up in the absence of heat. This is why it softens and conforms to your body when you lay on it then gradually bounces back when you get up – it responds to your body heat. So it may be a bit hard at first in cold temps,… Read more »
Hello. Does your mattress “slip” at night, meaning the two pieces move away from each other?? Also, we have a Ford extended van. Do you still think the mattress needs to be split?
Hi Tina, thanks for reading! Our bed frame fits pretty tight to the mattress so we don’t have any problems with it sliding around. Whether you want to cut it is up to you. You definitely have more room with an extended and could leave it – then you would have a bed available all the time. If you cut it, you would have more living space during the day, but would have to convert the bed at night. Either will work, just depends on what you prefer. Hope that helps!
~John
Hey so my partner & I are thinking about purchasing the same mattress that you guys did for our van. We have read some positive & negative reviews so wanted to reach out to see after using for awhile how has it been holding up?? still recommend??
Hi Brittany, thanks for commenting! Mattresses are definitely very subjective, but ours is holding up great so far. We think it’s comfortable, and the 6 inch depth strikes a good balance between height and comfort. It’s not quite as nice as the 10-inch Tuft & Needle mattress we had in our house, but we have no complaints. I hope that helps!
~John
So we’re struggling with how to have 2 sleeping areas in the van. In my comment on stripping out the van, I stated that I have the gmc version of the express and the hightop is tricked out and leading me to avoid stripping it out.
In this topic, the only option I have been able to.come up with is a double size bed going across the back and a twin that slide under it, leaving a seating spot exposed. Do you have any other ideas for how I.can achieve this?
That’s an interesting question, and one we’ve been kicking around ourselves for our next van. A bed that slides out from under your main bed is a good idea. Here are some others: –You could potentially rig something up that flips out from one of the walls. –We’ve seen some people rig up a cot out of PVC and suspend it over their front seats. Here’s an example. –Looking at floor plans and layouts of van conversion companies can be a good place to get more ideas. Here’s a link to Sportsmobile’s layout options, which may be helpful. Hope that… Read more »